
Thank you @Gordon and @KathyNS This will be the basis for the design and fabrication of my top plate.
To make sure my understanding is thorough, the top plate will be affixed by J bolts coming out of the top of the concrete pedestal so it will have holes for the J bolts. Additionally, it will have holes for the metal pier for attachment to that plate. I hope my understanding is correct.
It's Finally Time To Build My Observatory
-
JayTee


- Co-Administrator

- Articles: 2
- Posts: 5657
- Joined: Thu Apr 25, 2019 3:23 am
- 5
- Location: Idaho, USA
- Status:
Offline
-
TSS Awards Badges
TSS Photo of the Day
Re: It's Finally Time To Build My Observatory
∞ Primary Scopes: #1: Celestron CPC1100 #2: 8" f/7.5 Dob #3: CR150HD f/8 6" frac
∞ AP Scopes: #1: TPO 6" f/9 RC #2: ES 102 f/7 APO #3: ES 80mm f/6 APO
∞ G&G Scopes: #1: Meade 102mm f/7.8 #2: Bresser 102mm f/4.5
∞ Guide Scopes: 70 & 80mm fracs -- The El Cheapo Bros.
∞ Mounts: iOptron CEM70AG, SW EQ6R, Celestron AVX, SLT & GT (Alt-Az), Meade DS2000
∞ Cameras: #1: ZWO ASI294MC Pro #2: 662MC #3: 120MC, Canon T3i, Orion SSAG, WYZE Cam3
∞ Binos: 10X50,11X70,15X70, 25X100 ∞ AP Gear: ZWO EAF and mini EFW and the Optolong L-eXteme filter
∞ EPs: ES 2": 21mm 100° & 30mm 82° Pentax XW: 7, 10, 14, & 20mm 70°
Searching the skies since 1966. "I never met a scope I didn't want to keep."
-
Gordon
- Site Admin

- Articles: 1051
- Posts: 8477
- Joined: Wed Apr 24, 2019 10:52 pm
- 5
- Location: Cottonwood, AZ
- Status:
Offline
-
TSS Awards Badges
TSS Photo of the Day
I Broke The Forum.
TSS EAA Messier awards
Re: It's Finally Time To Build My Observatory
As Kathy mentioned. If you are going to mount a pier on top of the concrete pier you will need to get the metal pier so you can locate the bolts for the concrete.
If you look closely at this photo you will see a wood plate with 4 bolts with nuts holding the bolts in position. This was the 'template' I made to locate the bolts in the top of the concrete.
https://theskysearchers.com/download/fi ... &mode=view
If you look closely at this photo you will see a wood plate with 4 bolts with nuts holding the bolts in position. This was the 'template' I made to locate the bolts in the top of the concrete.
https://theskysearchers.com/download/fi ... &mode=view
Gordon
Scopes: Explore Scientific ED80CF, Skywatcher 200 Quattro Imaging Newt, SeeStar S50 for EAA.
Mounts: Orion Atlas EQ-g mount & Skywatcher EQ5 Pro.
ZWO mini guider.
Image cameras: ZWO ASI1600 MM Cool, ZWO ASI533mc-Pro, ZWO ASI174mm-C (for use with my Quark chromosphere), ZWO ASI120MC
Filters: LRGB, Ha 7nm, O-III 7nm, S-II 7nm
Eyepieces: a few.
Primary software: Cartes du Ciel, N.I.N.A, StarTools V1.4.
-
JayTee
- Co-Administrator
- Articles: 2
- Posts: 5657
- Joined: Thu Apr 25, 2019 3:23 am
- 5
- Location: Idaho, USA
- Status:
Offline
-
TSS Awards Badges
TSS Photo of the Day
Re: It's Finally Time To Build My Observatory
@Gordon The iOptron pier has been ordered and shipped. It should arrive here either later this week or early next week. Once I have the pier, I will fabricate the plate and then pour the concrete pedestal (using a 10" Sonotube) on top of the footing using the plate or a wood facsimile to keep everything aligned. Coming out the bottom of the plate will be the "J" bolts that get submerged in the pedestal's concrete.
@KathyNS Next question, should I tap the holes in the plate that will be used to affix the iOptron pier, or should they just be "pass-through" holes that will need nuts for securing and locking?
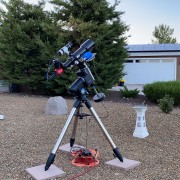
Here is a picture of the iOptron pier.
∞ Primary Scopes: #1: Celestron CPC1100 #2: 8" f/7.5 Dob #3: CR150HD f/8 6" frac
∞ AP Scopes: #1: TPO 6" f/9 RC #2: ES 102 f/7 APO #3: ES 80mm f/6 APO
∞ G&G Scopes: #1: Meade 102mm f/7.8 #2: Bresser 102mm f/4.5
∞ Guide Scopes: 70 & 80mm fracs -- The El Cheapo Bros.
∞ Mounts: iOptron CEM70AG, SW EQ6R, Celestron AVX, SLT & GT (Alt-Az), Meade DS2000
∞ Cameras: #1: ZWO ASI294MC Pro #2: 662MC #3: 120MC, Canon T3i, Orion SSAG, WYZE Cam3
∞ Binos: 10X50,11X70,15X70, 25X100 ∞ AP Gear: ZWO EAF and mini EFW and the Optolong L-eXteme filter
∞ EPs: ES 2": 21mm 100° & 30mm 82° Pentax XW: 7, 10, 14, & 20mm 70°
Searching the skies since 1966. "I never met a scope I didn't want to keep."
-
KathyNS Online


- Co-Administrator
- Articles: 0
- Posts: 2637
- Joined: Thu Apr 25, 2019 11:47 am
- 5
- Location: Nova Scotia
- Status:
Online
-
TSS Photo of the Day
TSS Awards Badges
Re: It's Finally Time To Build My Observatory
Personally, I would use nuts and not tap the holes. If you do that, the plate will need to stand above the concrete so you can get at the nuts. Or the bolt heads, if you insert the bolts from below. That in turn means that you will need double nuts on the J-bolts, one below the plate and one above.
If you tap the holes, you can get away with snugging the plate down onto the concrete. One disadvantage is the danger of pulling the J-bolts out of the concrete if it is not yet firm enough. You have to make sure that the bolts holding the pier onto the plate are no longer than the thickness of the plate. And, consequently, the plate needs to be fairly thick.

DSO AP: Orion 200mm f/4 Newtonian Astrograph; ATIK 383L+; EFW2 filter wheel; Astrodon Ha,Oiii,LRGB filters; KWIQ/QHY5 guide scope; Planetary AP: Celestron C-11; ZWO ASI120MC; Portable: Celestron C-8 on HEQ5 pro; C-90 on wedge; 20x80 binos; Etc: Canon 350D; Various EPs, etc. Obs: 8' Exploradome; iOptron CEM60 (pier); Helena Observatory (H2O) Astrobin
-
JayTee
- Co-Administrator
- Articles: 2
- Posts: 5657
- Joined: Thu Apr 25, 2019 3:23 am
- 5
- Location: Idaho, USA
- Status:
Offline
-
TSS Awards Badges
TSS Photo of the Day
Re: It's Finally Time To Build My Observatory
Well, a lot has been accomplished since my last post and I am crafting a progress report.
I do have one construction question that I need an answer to in regards to the adapter plate from the concrete pedestal to the metal Pier on which the mount will sit. My question is should the metal adapter plate sit flush to the concrete pedestal or should I put some spacers above above the concrete pedestal to leave about a 15 to 20 mm gap between the pedestal and the adapter plate?
This is the concrete side of the adapter plate
This is the pier side of the adapter plate
This is the pier sitting on the plate.
And these are pictures of the two different options.
Comments, questions, and critiques are welcome. Thanks.
∞ Primary Scopes: #1: Celestron CPC1100 #2: 8" f/7.5 Dob #3: CR150HD f/8 6" frac
∞ AP Scopes: #1: TPO 6" f/9 RC #2: ES 102 f/7 APO #3: ES 80mm f/6 APO
∞ G&G Scopes: #1: Meade 102mm f/7.8 #2: Bresser 102mm f/4.5
∞ Guide Scopes: 70 & 80mm fracs -- The El Cheapo Bros.
∞ Mounts: iOptron CEM70AG, SW EQ6R, Celestron AVX, SLT & GT (Alt-Az), Meade DS2000
∞ Cameras: #1: ZWO ASI294MC Pro #2: 662MC #3: 120MC, Canon T3i, Orion SSAG, WYZE Cam3
∞ Binos: 10X50,11X70,15X70, 25X100 ∞ AP Gear: ZWO EAF and mini EFW and the Optolong L-eXteme filter
∞ EPs: ES 2": 21mm 100° & 30mm 82° Pentax XW: 7, 10, 14, & 20mm 70°
Searching the skies since 1966. "I never met a scope I didn't want to keep."
∞ AP Scopes: #1: TPO 6" f/9 RC #2: ES 102 f/7 APO #3: ES 80mm f/6 APO
∞ G&G Scopes: #1: Meade 102mm f/7.8 #2: Bresser 102mm f/4.5
∞ Guide Scopes: 70 & 80mm fracs -- The El Cheapo Bros.
∞ Mounts: iOptron CEM70AG, SW EQ6R, Celestron AVX, SLT & GT (Alt-Az), Meade DS2000
∞ Cameras: #1: ZWO ASI294MC Pro #2: 662MC #3: 120MC, Canon T3i, Orion SSAG, WYZE Cam3
∞ Binos: 10X50,11X70,15X70, 25X100 ∞ AP Gear: ZWO EAF and mini EFW and the Optolong L-eXteme filter
∞ EPs: ES 2": 21mm 100° & 30mm 82° Pentax XW: 7, 10, 14, & 20mm 70°
Searching the skies since 1966. "I never met a scope I didn't want to keep."
-
KathyNS Online
- Co-Administrator
- Articles: 0
- Posts: 2637
- Joined: Thu Apr 25, 2019 11:47 am
- 5
- Location: Nova Scotia
- Status:
Online
-
TSS Photo of the Day
TSS Awards Badges
Re: It's Finally Time To Build My Observatory
I can't see any reason for a gap unless you need to get a wrench in there.
DSO AP: Orion 200mm f/4 Newtonian Astrograph; ATIK 383L+; EFW2 filter wheel; Astrodon Ha,Oiii,LRGB filters; KWIQ/QHY5 guide scope; Planetary AP: Celestron C-11; ZWO ASI120MC; Portable: Celestron C-8 on HEQ5 pro; C-90 on wedge; 20x80 binos; Etc: Canon 350D; Various EPs, etc. Obs: 8' Exploradome; iOptron CEM60 (pier); Helena Observatory (H2O) Astrobin
-
JayTee
- Co-Administrator
- Articles: 2
- Posts: 5657
- Joined: Thu Apr 25, 2019 3:23 am
- 5
- Location: Idaho, USA
- Status:
Offline
-
TSS Awards Badges
TSS Photo of the Day
Re: It's Finally Time To Build My Observatory
Thank you @KathyNS
I can't think of a reason why I would want the gap there. I'm just making sure I didn't miss something. No wrenches are required on the underside of the adapter plate. So there's no reason not to put it flush on the concrete pedestal, assuming I can make that level which I will try diligently to do.
I can't think of a reason why I would want the gap there. I'm just making sure I didn't miss something. No wrenches are required on the underside of the adapter plate. So there's no reason not to put it flush on the concrete pedestal, assuming I can make that level which I will try diligently to do.
∞ Primary Scopes: #1: Celestron CPC1100 #2: 8" f/7.5 Dob #3: CR150HD f/8 6" frac
∞ AP Scopes: #1: TPO 6" f/9 RC #2: ES 102 f/7 APO #3: ES 80mm f/6 APO
∞ G&G Scopes: #1: Meade 102mm f/7.8 #2: Bresser 102mm f/4.5
∞ Guide Scopes: 70 & 80mm fracs -- The El Cheapo Bros.
∞ Mounts: iOptron CEM70AG, SW EQ6R, Celestron AVX, SLT & GT (Alt-Az), Meade DS2000
∞ Cameras: #1: ZWO ASI294MC Pro #2: 662MC #3: 120MC, Canon T3i, Orion SSAG, WYZE Cam3
∞ Binos: 10X50,11X70,15X70, 25X100 ∞ AP Gear: ZWO EAF and mini EFW and the Optolong L-eXteme filter
∞ EPs: ES 2": 21mm 100° & 30mm 82° Pentax XW: 7, 10, 14, & 20mm 70°
Searching the skies since 1966. "I never met a scope I didn't want to keep."
∞ AP Scopes: #1: TPO 6" f/9 RC #2: ES 102 f/7 APO #3: ES 80mm f/6 APO
∞ G&G Scopes: #1: Meade 102mm f/7.8 #2: Bresser 102mm f/4.5
∞ Guide Scopes: 70 & 80mm fracs -- The El Cheapo Bros.
∞ Mounts: iOptron CEM70AG, SW EQ6R, Celestron AVX, SLT & GT (Alt-Az), Meade DS2000
∞ Cameras: #1: ZWO ASI294MC Pro #2: 662MC #3: 120MC, Canon T3i, Orion SSAG, WYZE Cam3
∞ Binos: 10X50,11X70,15X70, 25X100 ∞ AP Gear: ZWO EAF and mini EFW and the Optolong L-eXteme filter
∞ EPs: ES 2": 21mm 100° & 30mm 82° Pentax XW: 7, 10, 14, & 20mm 70°
Searching the skies since 1966. "I never met a scope I didn't want to keep."
-
AstroBee
- Moderator

- Articles: 0
- Posts: 2362
- Joined: Thu Nov 14, 2019 11:03 pm
- 4
- Location: Henderson, NV
- Status:
Offline
-
TSS Awards Badges
TSS Photo of the Day
Re: It's Finally Time To Build My Observatory
**EDIT** I just realized that what I thought was your last post was actually the last post on page 1 of 3... I now see you are moving right along with the project.
JT, when I originally saw your design I thought that you had come up with that unique design for some sort of space restrictions, i.e. not room for a traditional roll-off roof. But now that I see your last post, I see that space is one thing you have in abundance. With that in mind, I would recommend not trying to reinvent the wheel and going with a traditional roll-off design. Besides the fact that the type is tried and true, there are plenty of people out there that will easily be able to give you advice with a "standard" roll-off design, whereas your unique design might put you on your own when it comes to "fixing" issues that will inevitably arise.
Also, if I had that much space I'd make it considerably larger so you can have that star party INSIDE the roll-off! Of course, easy for me to say, spending someone else's money...
Greg M.~ "Ad Astra per Aspera"
Scopes: Celestron EdgeHD14", Explore Scientific ED152CF & ED127 APO's, StellarVue SV70T, Classic Orange-Tube C-8, Lunt 80mm Ha double-stack solar scope.
Mounts: Astro-Physics Mach One, iOptron CEM70EC Mount, iOptron ZEQ25 Mount.
Cameras: ZWO ASI2600mm Pro, ZWO 2600MC Pro, ZWO ASI1600mm
Filters: 36mm Chroma LRGB & 3nm Ha, OIII, SII, L-Pro, L-eXtreme
Eyepieces: 27mm TeleVue Panoptic, 4mm TeleVue Radian, Explore Scientific 82° 30mm, 6.7mm , Baader 13mm Hyperion, Explore Scientific 70° 10mm, 15mm, 20mm, Meade 8.8mm UWA
Software: N.I.N.A., SharpCapPro, PixInsight, PhotoShop CC, Phd2, Stellarium
https://www.nevadadesertskies.com
-
JayTee
- Co-Administrator
- Articles: 2
- Posts: 5657
- Joined: Thu Apr 25, 2019 3:23 am
- 5
- Location: Idaho, USA
- Status:
Offline
-
TSS Awards Badges
TSS Photo of the Day
Re: It's Finally Time To Build My Observatory
Hi Greg,
Thanks for your input. I do have a kind of space restriction. The obsy is going in the horse pasture and my wife asked that I use as small a footprint as possible. The superstructure of a ROR leaves vertical supports far enough away from the main building that they pose a potential risk to our horses. According to my wife, they see obstacles differently than we do. Besides the fact, and this is just my personal opinion, ROR's are hideously ugly.
All that being said, I am fully committed to make this Roll Up Roof (RUR) design functional, practical, and reproducible! Additionally, I do have a plan B and plan C already conceived just in case. So I'm not optionless.
Thanks,
∞ Primary Scopes: #1: Celestron CPC1100 #2: 8" f/7.5 Dob #3: CR150HD f/8 6" frac
∞ AP Scopes: #1: TPO 6" f/9 RC #2: ES 102 f/7 APO #3: ES 80mm f/6 APO
∞ G&G Scopes: #1: Meade 102mm f/7.8 #2: Bresser 102mm f/4.5
∞ Guide Scopes: 70 & 80mm fracs -- The El Cheapo Bros.
∞ Mounts: iOptron CEM70AG, SW EQ6R, Celestron AVX, SLT & GT (Alt-Az), Meade DS2000
∞ Cameras: #1: ZWO ASI294MC Pro #2: 662MC #3: 120MC, Canon T3i, Orion SSAG, WYZE Cam3
∞ Binos: 10X50,11X70,15X70, 25X100 ∞ AP Gear: ZWO EAF and mini EFW and the Optolong L-eXteme filter
∞ EPs: ES 2": 21mm 100° & 30mm 82° Pentax XW: 7, 10, 14, & 20mm 70°
Searching the skies since 1966. "I never met a scope I didn't want to keep."
∞ AP Scopes: #1: TPO 6" f/9 RC #2: ES 102 f/7 APO #3: ES 80mm f/6 APO
∞ G&G Scopes: #1: Meade 102mm f/7.8 #2: Bresser 102mm f/4.5
∞ Guide Scopes: 70 & 80mm fracs -- The El Cheapo Bros.
∞ Mounts: iOptron CEM70AG, SW EQ6R, Celestron AVX, SLT & GT (Alt-Az), Meade DS2000
∞ Cameras: #1: ZWO ASI294MC Pro #2: 662MC #3: 120MC, Canon T3i, Orion SSAG, WYZE Cam3
∞ Binos: 10X50,11X70,15X70, 25X100 ∞ AP Gear: ZWO EAF and mini EFW and the Optolong L-eXteme filter
∞ EPs: ES 2": 21mm 100° & 30mm 82° Pentax XW: 7, 10, 14, & 20mm 70°
Searching the skies since 1966. "I never met a scope I didn't want to keep."
-
SkyHiker

- Articles: 0
- Posts: 2293
- Joined: Sat May 11, 2019 8:40 pm
- 5
- Location: Santa Barbara, CA
- Status:
Offline
-
TSS Photo of the Day
TSS Awards Badges
Re: It's Finally Time To Build My Observatory
Yes, they are, the usual ones. But if you put the tracks on the ground instead of on raised pillars with rails in the air, they are not. They will just look like a regular shed. I know you won't change your mind so good luck and may it work out for you without gotchas.
... Henk.  Telescopes: GSO 12" Astrograph, "Comet Hunter" MN152, ES ED127CF, ES ED80, WO Redcat51, Z12, AT6RC, Celestron Skymaster 20x80, Mounts and tripod: Losmandy G11S with OnStep, AVX, Tiltall, Cameras: ASI2600MC, ASI2600MM, ASI120 mini, Fuji X-a1, Canon XSi, T6, ELPH 100HS, DIY: OnStep controller, Pi4b/power rig, Afocal adapter, Foldable Dob base, Az/Alt Dob setting circles, Accessories: ZWO 36 mm filter wheel, TV Paracorr 2, Baader MPCC Mk III, ES FF, SSAG, QHY OAG-M, EAF electronic focuser, Plossls, Barlows, Telrad, Laser collimators (Seben LK1, Z12, Howie Glatter), Cheshire, 2 Orion RACIs 8x50, Software: KStars-Ekos, DSS, PHD2, Nebulosity, Photo Gallery, Gimp, CHDK, Computers:Pi4b, 2x running KStars/Ekos, Toshiba Satellite 17", Website:Henk's astro images
-
JayTee
- Co-Administrator
- Articles: 2
- Posts: 5657
- Joined: Thu Apr 25, 2019 3:23 am
- 5
- Location: Idaho, USA
- Status:
Offline
-
TSS Awards Badges
TSS Photo of the Day
Re: It's Finally Time To Build My Observatory
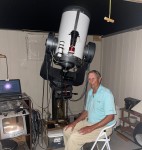
Finally, the latest progress report.
Last weekend, we engaged in the digging and pouring of the footing for the observatory. My youngest son and I laid out where the slab would go in the horse pasture. From there, we measured, based on my mock-up floor plan in my garage, where the footing and pedestal would be located on the slab. Once that was done now it was just a matter of digging a square hole 36” X 36” X 30” whole. 6 hours later we made it all the way down to 29” and called it quits before somebody had a coronary!
The wooden form was previously made and ready to be put in the hole. Once in the hole we staked all four sides for support and left it for the night.
The next day (Sunday) we made ready for a day of concrete mixing and dumping. My wheelbarrow could only hold 2 bags at a time which, in retrospect, made the "hole" experience a little easier. Ten bags of concrete later, we had a form filled with concrete, 2 metal support matrices, and vertical rebar for the sono tube. Another 8-hour day finished with positive results and two happy construction workers.
The following day I went out and removed the form boards. I used a small sledgehammer (5 pounder) to bust the form boards away from the concrete. It went as easily as I hoped.
I was quickly getting everything ready because the concrete slab contractor asked if he could come 2 days early to help his scheduling, I agreed to the earlier pouring date which moved the pouring up from last Friday to last Wednesday.
I now filled the gap between the sides of the dirt hole and the footing with some of the dirt we extracted from the hole. I watered it down to pack it in so there were no air gaps. Next came the placing of the sono tube centered over the rebar and “nearly” on the footing.
My handyman told me a week prior to use the expanding Styrofoam sealant in a can to hold the sono tube in place and seal the bottom so the concrete wouldn’t rush out the bottom. Once the foam was dry (it worked really well) I then used pea gravel on top of the footing and surrounding the sono tube.
I was now ready to pour the concrete into the sono tube to create the pedestal onto which the permanent metal pier would be placed. I could not pour that concrete until I had my steel adapter plate that allowed the metal pier to be fastened to the pedestal and it wasn’t ready yet.
I had no choice but to go ahead with the slab pour before the pedestal was complete. I was pretty sure the concrete guys could do this without impacting the placement of the sono tube.
So as of now, I have a 16’ X 16’ slab with a sono tube and steel adapter plate waiting for me to pour the last batch of concrete, which will happen tomorrow. Lastly, the garage door will be ordered this week with delivery at the end of this month. Then all I’m left with is awaiting my obsy which should be here mid to late August.
Time for pictures.
This is a view looking north the "slab" will be poured near the gate (orange circle) and 30' inland from the wire fence, not the white fence.
This view is looking south across where the slab will be located.
This is my "position simulator" laid out in my garage. It helped me figure out where exactly the footing/pedestal should be placed. Conveniently enough, the concrete expansion lines are 10' apart (my obsy viewing area is 10' X 10')
The slab corners were marked with orange spray paint to help the concrete guys. You can see where I will dig the hole for the footing. The slab's orientation will be accurate to the cardinal points (NSEW).
6 hours of digging. My soil is very unkind! And the form box is already in place.
This is a piece of deer fence cut to size. Because the footing is not structural pretty much anything would have worked for concrete reinforcement, even chicken wire. I used two of these fence pieces during the pour. One at the 1/3 level, the second at the 2/3 level.
Reinforcement in place.
This is the template I used to make sure my pedestal rebar was space properly and vertical.
Footing poured. Yay!
Fast forward to Wednesday of last week and you see that the concrete crew has set up the forms and is currently graveling the site.
This close-up shows the sono tube in place and the electrical conduit in place.
The slab is poured and soon will be ready for a building.
These are the expansion joints showing the pedestal sono tube.
I scratched a big "N" on the north edge for those who are directionally challenged.
When the pedestal is poured it will have the adapter plate pushed into it so the metal pier has something to attach to. This operation needs to be kept very level and properly oriented to the north.
Ready for concrete.
It looks like a boxing ring, but this was put up to convince the horses to stay away from it. This needed to work for 48 hours and it did.
Well, you now know where I'm at for this project. Albeit, some back aggravating work but all in all it has progressed very smoothly. (hope I didn't just jinx myself!)
Cheers,
Last weekend, we engaged in the digging and pouring of the footing for the observatory. My youngest son and I laid out where the slab would go in the horse pasture. From there, we measured, based on my mock-up floor plan in my garage, where the footing and pedestal would be located on the slab. Once that was done now it was just a matter of digging a square hole 36” X 36” X 30” whole. 6 hours later we made it all the way down to 29” and called it quits before somebody had a coronary!
The wooden form was previously made and ready to be put in the hole. Once in the hole we staked all four sides for support and left it for the night.
The next day (Sunday) we made ready for a day of concrete mixing and dumping. My wheelbarrow could only hold 2 bags at a time which, in retrospect, made the "hole" experience a little easier. Ten bags of concrete later, we had a form filled with concrete, 2 metal support matrices, and vertical rebar for the sono tube. Another 8-hour day finished with positive results and two happy construction workers.
The following day I went out and removed the form boards. I used a small sledgehammer (5 pounder) to bust the form boards away from the concrete. It went as easily as I hoped.
I was quickly getting everything ready because the concrete slab contractor asked if he could come 2 days early to help his scheduling, I agreed to the earlier pouring date which moved the pouring up from last Friday to last Wednesday.
I now filled the gap between the sides of the dirt hole and the footing with some of the dirt we extracted from the hole. I watered it down to pack it in so there were no air gaps. Next came the placing of the sono tube centered over the rebar and “nearly” on the footing.
My handyman told me a week prior to use the expanding Styrofoam sealant in a can to hold the sono tube in place and seal the bottom so the concrete wouldn’t rush out the bottom. Once the foam was dry (it worked really well) I then used pea gravel on top of the footing and surrounding the sono tube.
I was now ready to pour the concrete into the sono tube to create the pedestal onto which the permanent metal pier would be placed. I could not pour that concrete until I had my steel adapter plate that allowed the metal pier to be fastened to the pedestal and it wasn’t ready yet.
I had no choice but to go ahead with the slab pour before the pedestal was complete. I was pretty sure the concrete guys could do this without impacting the placement of the sono tube.
So as of now, I have a 16’ X 16’ slab with a sono tube and steel adapter plate waiting for me to pour the last batch of concrete, which will happen tomorrow. Lastly, the garage door will be ordered this week with delivery at the end of this month. Then all I’m left with is awaiting my obsy which should be here mid to late August.
Time for pictures.
Well, you now know where I'm at for this project. Albeit, some back aggravating work but all in all it has progressed very smoothly. (hope I didn't just jinx myself!)
Cheers,
∞ Primary Scopes: #1: Celestron CPC1100 #2: 8" f/7.5 Dob #3: CR150HD f/8 6" frac
∞ AP Scopes: #1: TPO 6" f/9 RC #2: ES 102 f/7 APO #3: ES 80mm f/6 APO
∞ G&G Scopes: #1: Meade 102mm f/7.8 #2: Bresser 102mm f/4.5
∞ Guide Scopes: 70 & 80mm fracs -- The El Cheapo Bros.
∞ Mounts: iOptron CEM70AG, SW EQ6R, Celestron AVX, SLT & GT (Alt-Az), Meade DS2000
∞ Cameras: #1: ZWO ASI294MC Pro #2: 662MC #3: 120MC, Canon T3i, Orion SSAG, WYZE Cam3
∞ Binos: 10X50,11X70,15X70, 25X100 ∞ AP Gear: ZWO EAF and mini EFW and the Optolong L-eXteme filter
∞ EPs: ES 2": 21mm 100° & 30mm 82° Pentax XW: 7, 10, 14, & 20mm 70°
Searching the skies since 1966. "I never met a scope I didn't want to keep."
∞ AP Scopes: #1: TPO 6" f/9 RC #2: ES 102 f/7 APO #3: ES 80mm f/6 APO
∞ G&G Scopes: #1: Meade 102mm f/7.8 #2: Bresser 102mm f/4.5
∞ Guide Scopes: 70 & 80mm fracs -- The El Cheapo Bros.
∞ Mounts: iOptron CEM70AG, SW EQ6R, Celestron AVX, SLT & GT (Alt-Az), Meade DS2000
∞ Cameras: #1: ZWO ASI294MC Pro #2: 662MC #3: 120MC, Canon T3i, Orion SSAG, WYZE Cam3
∞ Binos: 10X50,11X70,15X70, 25X100 ∞ AP Gear: ZWO EAF and mini EFW and the Optolong L-eXteme filter
∞ EPs: ES 2": 21mm 100° & 30mm 82° Pentax XW: 7, 10, 14, & 20mm 70°
Searching the skies since 1966. "I never met a scope I didn't want to keep."
-
Gordon
- Site Admin
- Articles: 1051
- Posts: 8477
- Joined: Wed Apr 24, 2019 10:52 pm
- 5
- Location: Cottonwood, AZ
- Status:
Offline
-
TSS Awards Badges
TSS Photo of the Day
I Broke The Forum.
TSS EAA Messier awards
Re: It's Finally Time To Build My Observatory
Well, it looks like it’s moving right along!
Congratulations on your results so far. I’m looking forward to your next report!
Congratulations on your results so far. I’m looking forward to your next report!
Gordon
Scopes: Explore Scientific ED80CF, Skywatcher 200 Quattro Imaging Newt, SeeStar S50 for EAA.
Mounts: Orion Atlas EQ-g mount & Skywatcher EQ5 Pro.
ZWO mini guider.
Image cameras: ZWO ASI1600 MM Cool, ZWO ASI533mc-Pro, ZWO ASI174mm-C (for use with my Quark chromosphere), ZWO ASI120MC
Filters: LRGB, Ha 7nm, O-III 7nm, S-II 7nm
Eyepieces: a few.
Primary software: Cartes du Ciel, N.I.N.A, StarTools V1.4.
-
Gordon
- Site Admin
- Articles: 1051
- Posts: 8477
- Joined: Wed Apr 24, 2019 10:52 pm
- 5
- Location: Cottonwood, AZ
- Status:
Offline
-
TSS Awards Badges
TSS Photo of the Day
I Broke The Forum.
TSS EAA Messier awards
Re: It's Finally Time To Build My Observatory
@JayTee
Any progress lately?
Any progress lately?
Gordon
Scopes: Explore Scientific ED80CF, Skywatcher 200 Quattro Imaging Newt, SeeStar S50 for EAA.
Mounts: Orion Atlas EQ-g mount & Skywatcher EQ5 Pro.
ZWO mini guider.
Image cameras: ZWO ASI1600 MM Cool, ZWO ASI533mc-Pro, ZWO ASI174mm-C (for use with my Quark chromosphere), ZWO ASI120MC
Filters: LRGB, Ha 7nm, O-III 7nm, S-II 7nm
Eyepieces: a few.
Primary software: Cartes du Ciel, N.I.N.A, StarTools V1.4.
-
JayTee
- Co-Administrator
- Articles: 2
- Posts: 5657
- Joined: Thu Apr 25, 2019 3:23 am
- 5
- Location: Idaho, USA
- Status:
Offline
-
TSS Awards Badges
TSS Photo of the Day
Re: It's Finally Time To Build My Observatory
Hi All,
There has been both progress and problems.
I find myself in the unique position of doing something I've really never done before, I'm now a general contractor! There are several distinct parts to getting the Obsy built:
I did the work for the concrete footing, pedestal, and adapter plate giving the iOptron 900mm pier a place to attach. This is the only work that I personally have accomplished. Everything else has been subcontracted out, these jobs included the pouring of the 16' X 16' X 4" concrete slab, the building of the Obsy building, supplying electricity out to the Obsy, and fitting on the custom roll-up roof. All pieces parts are now scheduled and I am just waiting for the building to be delivered on Tuesday 30 August. The building gets electricity 3 days later and the roll-up roof goes on the following week. So, YAY for progress.
Now the problem. The metal adapter plate that has four 6" J-bolts sunk into the concrete thereby affixing it to the pedestal, unfortunately, it is not solidly affixed. It moves up and down by about 1/8" to 1/4". I'm not sure why it is doing this, I thought I firmly seated it into the wet concrete but a gap in the concrete must have occurred during the drying and curing. There is also a gap between the bottom of the plate and the top of the concrete pedestal. I asked my concrete guy if there was some substance I could inject into that gap that would force the plate upwards thereby locking it into place, he said he was unaware of any concrete/cement product that would accomplish that. The only solution I've thought of is to use 3 or 4 steel wedges (pieces of steel 6" long and tapering from 0.1" up to 0.3". These wedges would also force the plate upwards and hopefully locking the adapter plate into an unmovable position. I would then fill up the remaining gap space with something like Liquid Nails.
If anyone has any other ideas short of jackhammering the adapter plate out of the concrete and starting over, please, please let me know.
Here's a picture of the adapter plate and the concrete pedestal showing the existing gap.
Here's a vid showing the motion of the plate. I attached the pier to better illustrate the motion. Through the wind, you can hear the clicking motion.
To say I was pretty upset by this issue is an understatement!!! But since I'm the only one who did this work, I only have myself to blame. More posts will occur after the fix is applied and when the Obsy is delivered.
Cheers,
∞ Primary Scopes: #1: Celestron CPC1100 #2: 8" f/7.5 Dob #3: CR150HD f/8 6" frac
∞ AP Scopes: #1: TPO 6" f/9 RC #2: ES 102 f/7 APO #3: ES 80mm f/6 APO
∞ G&G Scopes: #1: Meade 102mm f/7.8 #2: Bresser 102mm f/4.5
∞ Guide Scopes: 70 & 80mm fracs -- The El Cheapo Bros.
∞ Mounts: iOptron CEM70AG, SW EQ6R, Celestron AVX, SLT & GT (Alt-Az), Meade DS2000
∞ Cameras: #1: ZWO ASI294MC Pro #2: 662MC #3: 120MC, Canon T3i, Orion SSAG, WYZE Cam3
∞ Binos: 10X50,11X70,15X70, 25X100 ∞ AP Gear: ZWO EAF and mini EFW and the Optolong L-eXteme filter
∞ EPs: ES 2": 21mm 100° & 30mm 82° Pentax XW: 7, 10, 14, & 20mm 70°
Searching the skies since 1966. "I never met a scope I didn't want to keep."
∞ AP Scopes: #1: TPO 6" f/9 RC #2: ES 102 f/7 APO #3: ES 80mm f/6 APO
∞ G&G Scopes: #1: Meade 102mm f/7.8 #2: Bresser 102mm f/4.5
∞ Guide Scopes: 70 & 80mm fracs -- The El Cheapo Bros.
∞ Mounts: iOptron CEM70AG, SW EQ6R, Celestron AVX, SLT & GT (Alt-Az), Meade DS2000
∞ Cameras: #1: ZWO ASI294MC Pro #2: 662MC #3: 120MC, Canon T3i, Orion SSAG, WYZE Cam3
∞ Binos: 10X50,11X70,15X70, 25X100 ∞ AP Gear: ZWO EAF and mini EFW and the Optolong L-eXteme filter
∞ EPs: ES 2": 21mm 100° & 30mm 82° Pentax XW: 7, 10, 14, & 20mm 70°
Searching the skies since 1966. "I never met a scope I didn't want to keep."
-
SkyHiker
- Articles: 0
- Posts: 2293
- Joined: Sat May 11, 2019 8:40 pm
- 5
- Location: Santa Barbara, CA
- Status:
Offline
-
TSS Photo of the Day
TSS Awards Badges
Re: It's Finally Time To Build My Observatory
I can imagine how you feel! That concrete does not look smooth at all, was it too dry or not well mixed? I am no expert but look at the difference with the surrounding floor.
How about digging the dirt around the concrete pillar out, putting a cylindrical mold around it, pouring concrete in it and sink new J bolts around the current pillar, hoping that the concrete collar will attach solidly to the current pillar. This time make sure the concrete is good and smooth. You will need to drill new holes in the base plate. Frankly I would get rid of the steel pier and make a concrete pier to avoid the steel engineering altogether.
How about digging the dirt around the concrete pillar out, putting a cylindrical mold around it, pouring concrete in it and sink new J bolts around the current pillar, hoping that the concrete collar will attach solidly to the current pillar. This time make sure the concrete is good and smooth. You will need to drill new holes in the base plate. Frankly I would get rid of the steel pier and make a concrete pier to avoid the steel engineering altogether.
... Henk. Telescopes: GSO 12" Astrograph, "Comet Hunter" MN152, ES ED127CF, ES ED80, WO Redcat51, Z12, AT6RC, Celestron Skymaster 20x80, Mounts and tripod: Losmandy G11S with OnStep, AVX, Tiltall, Cameras: ASI2600MC, ASI2600MM, ASI120 mini, Fuji X-a1, Canon XSi, T6, ELPH 100HS, DIY: OnStep controller, Pi4b/power rig, Afocal adapter, Foldable Dob base, Az/Alt Dob setting circles, Accessories: ZWO 36 mm filter wheel, TV Paracorr 2, Baader MPCC Mk III, ES FF, SSAG, QHY OAG-M, EAF electronic focuser, Plossls, Barlows, Telrad, Laser collimators (Seben LK1, Z12, Howie Glatter), Cheshire, 2 Orion RACIs 8x50, Software: KStars-Ekos, DSS, PHD2, Nebulosity, Photo Gallery, Gimp, CHDK, Computers:Pi4b, 2x running KStars/Ekos, Toshiba Satellite 17", Website:Henk's astro images
-
Greenman


- Articles: 0
- Posts: 2296
- Joined: Fri Sep 27, 2019 7:39 pm
- 4
- Location: Nether Heyford, UK
- Status:
Offline
-
TSS Photo of the Day
TSS Awards Badges
Re: It's Finally Time To Build My Observatory
Well I can't add much to what has already been said, I too have concerns over a garage door. In my experience the mechanism can be hit or miss with a vertical door, an inclined one will have very different stresses working againsts its operation. A solid RORO would seem a better choice.
Cheers,
Tony.

Smart Scope: Dwarf II - Club and outreach work.
AP Refractor: Altair 72EDF Deluxe F6;1x & 0.8 Flatteners; Antares Versascope 60mm finder. ASIAir Pro.Li battery pack for grab & go.
Celestron AVX Mount; X-cel LX eyepieces & Barlows 2x 3x, ZWO 2” Filter holder,
Cameras: main DSO ASI533MC; DSO guide ASI120MM; Planetary ASI224MC; DSLR Canon EOS100 stock.
Filters: Astronomik IR cut; Optolong L-Pro; Optolong L-Enhance.
Binoculars: Celestron 15 x 70.
Latitude: 52.219853
Longitude: -1.034471
Accuracy: 5 m
Bortle 4 site. https://maps.google.com/?q=52.21985,-1.03447

Tony.
Smart Scope: Dwarf II - Club and outreach work.
AP Refractor: Altair 72EDF Deluxe F6;1x & 0.8 Flatteners; Antares Versascope 60mm finder. ASIAir Pro.Li battery pack for grab & go.
Celestron AVX Mount; X-cel LX eyepieces & Barlows 2x 3x, ZWO 2” Filter holder,
Cameras: main DSO ASI533MC; DSO guide ASI120MM; Planetary ASI224MC; DSLR Canon EOS100 stock.
Filters: Astronomik IR cut; Optolong L-Pro; Optolong L-Enhance.
Binoculars: Celestron 15 x 70.
Latitude: 52.219853
Longitude: -1.034471
Accuracy: 5 m
Bortle 4 site. https://maps.google.com/?q=52.21985,-1.03447
-
SkyHiker
- Articles: 0
- Posts: 2293
- Joined: Sat May 11, 2019 8:40 pm
- 5
- Location: Santa Barbara, CA
- Status:
Offline
-
TSS Photo of the Day
TSS Awards Badges
Re: It's Finally Time To Build My Observatory
Never mind, I now see that the bottom 4 bolts are welded on to the adapter plate so there is no easy way to take it off and pour a collar around it. Filling it in with epoxy or liquid nails sounds like a bad idea because you can never get it filled in completely and the material is flexible so that defeats the point of having a solid concrete base - too patchy. I would either jackhammer it out and put in a concrete pier or simply put a Losmandy HD tripod on the floor.
Those bolts below the adapter plate seem to have a smooth surface, and no J but just very small caps at the end that are ultimately the only thing that keeps it in place because the smooth surface offers zero resistance. Threaded bolts would have been solid. Just in case you have to make a new base plate again, use threaded bolts and have a solid J on it.
Those bolts below the adapter plate seem to have a smooth surface, and no J but just very small caps at the end that are ultimately the only thing that keeps it in place because the smooth surface offers zero resistance. Threaded bolts would have been solid. Just in case you have to make a new base plate again, use threaded bolts and have a solid J on it.
... Henk. Telescopes: GSO 12" Astrograph, "Comet Hunter" MN152, ES ED127CF, ES ED80, WO Redcat51, Z12, AT6RC, Celestron Skymaster 20x80, Mounts and tripod: Losmandy G11S with OnStep, AVX, Tiltall, Cameras: ASI2600MC, ASI2600MM, ASI120 mini, Fuji X-a1, Canon XSi, T6, ELPH 100HS, DIY: OnStep controller, Pi4b/power rig, Afocal adapter, Foldable Dob base, Az/Alt Dob setting circles, Accessories: ZWO 36 mm filter wheel, TV Paracorr 2, Baader MPCC Mk III, ES FF, SSAG, QHY OAG-M, EAF electronic focuser, Plossls, Barlows, Telrad, Laser collimators (Seben LK1, Z12, Howie Glatter), Cheshire, 2 Orion RACIs 8x50, Software: KStars-Ekos, DSS, PHD2, Nebulosity, Photo Gallery, Gimp, CHDK, Computers:Pi4b, 2x running KStars/Ekos, Toshiba Satellite 17", Website:Henk's astro images
-
Gordon
- Site Admin
- Articles: 1051
- Posts: 8477
- Joined: Wed Apr 24, 2019 10:52 pm
- 5
- Location: Cottonwood, AZ
- Status:
Offline
-
TSS Awards Badges
TSS Photo of the Day
I Broke The Forum.
TSS EAA Messier awards
Re: It's Finally Time To Build My Observatory
It does appear that the concrete was poured pretty dry. Also did you 'tamp' it down after you poured it?
Did you use concrete anchor bolts?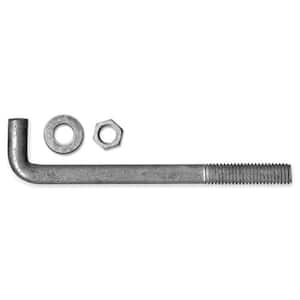 rather than just plain bolts?
As it is I'm afraid the motion of the mount moving will continue to cause the bolt to work loose. The concrete is so porous that even expansion bolts wouldn't hold.
Now for a few suggestions....
1. If you're up for the work you could break up the concrete dig it out and re-pour it. This time pour it wet (Like oat meal texture). then tamp it down using a stick as you are pouring it. You want to get all of the air bubbles out! Once the sono tube is filled to the top place your base template with the anchor bolts attached into the concrete and let is set up (a few days).
2. break up just the top part of the concrete and re-pour to fill in the entire blank area (you might want your contractor to do that.)
then use anchor bolts. Or have the contractor place your anchor bolts.
Other than those two options I don't what else to add.
Did you use concrete anchor bolts?
rather than just plain bolts?As it is I'm afraid the motion of the mount moving will continue to cause the bolt to work loose. The concrete is so porous that even expansion bolts wouldn't hold.
Now for a few suggestions....
1. If you're up for the work you could break up the concrete dig it out and re-pour it. This time pour it wet (Like oat meal texture). then tamp it down using a stick as you are pouring it. You want to get all of the air bubbles out! Once the sono tube is filled to the top place your base template with the anchor bolts attached into the concrete and let is set up (a few days).
2. break up just the top part of the concrete and re-pour to fill in the entire blank area (you might want your contractor to do that.)
then use anchor bolts. Or have the contractor place your anchor bolts.
Other than those two options I don't what else to add.
Gordon
Scopes: Explore Scientific ED80CF, Skywatcher 200 Quattro Imaging Newt, SeeStar S50 for EAA.
Mounts: Orion Atlas EQ-g mount & Skywatcher EQ5 Pro.
ZWO mini guider.
Image cameras: ZWO ASI1600 MM Cool, ZWO ASI533mc-Pro, ZWO ASI174mm-C (for use with my Quark chromosphere), ZWO ASI120MC
Filters: LRGB, Ha 7nm, O-III 7nm, S-II 7nm
Eyepieces: a few.
Primary software: Cartes du Ciel, N.I.N.A, StarTools V1.4.
-
sdbodin
- Articles: 0
- Posts: 1106
- Joined: Sat May 11, 2019 11:00 pm
- 5
- Location: Mattawa, WA, USA
- Status:
Offline
-
TSS Awards Badges
TSS Photo of the Day
Re: It's Finally Time To Build My Observatory
I seem to remember that I used 12" long j-bolts for my pier and the concrete mix was quite wet when poured. I have had no problems. Unfortunately you can't fix concrete, jack hammer time.
Steve
Steve
Scopes; Meade 16 LX200, AT80LE, plus bunch just sitting around gathering dust
Cameras; Atik 460ex mono, Zwo ASI1600MC-cool, QHY5L-II color and mono
Cameras; Atik 460ex mono, Zwo ASI1600MC-cool, QHY5L-II color and mono
-
JayTee
- Co-Administrator
- Articles: 2
- Posts: 5657
- Joined: Thu Apr 25, 2019 3:23 am
- 5
- Location: Idaho, USA
- Status:
Offline
-
TSS Awards Badges
TSS Photo of the Day
Re: It's Finally Time To Build My Observatory
Thank you everyone for your suggestions.
The break up the concrete pedestal to remove the plate is now my plan B.
As of today, I have a new plan A. I met with my metal fabricator to produce those metal shims to push into the space between the concrete and the metal plate forcing the plate upwards and hopefully holding it immobile. He said he does not do that kind of work, he does more large structure work. So he referred me to a machine shop that he works with regularly.
I visited with them early this afternoon and the owner of the shop came up with such an elegant idea that it has put an ear to ear grin on my face.
He he proposed drilling four strategically placed holes through the metal plate and continue down into the concrete pedestal by one or two inches. He would then tap the holes in the metal plate so that a proper sized bolt could be threaded through the plate and continue traveling on down to the hole in the top of the concrete pedestal. Once secured, these bolts would act as Jack screws to stabilize and immobilize that metal plate. Sometimes the simplest solutions are the best solutions.
Now over time the porous/course nature of that batch of concrete I mixed for the pedestal may drive me to Jackhammering it out and starting all over again. But for now I'm happy with going after plan A,
I will let you know how it turns out, but I'm very confident that this will eliminate the problem.
YAY,
∞ Primary Scopes: #1: Celestron CPC1100 #2: 8" f/7.5 Dob #3: CR150HD f/8 6" frac
∞ AP Scopes: #1: TPO 6" f/9 RC #2: ES 102 f/7 APO #3: ES 80mm f/6 APO
∞ G&G Scopes: #1: Meade 102mm f/7.8 #2: Bresser 102mm f/4.5
∞ Guide Scopes: 70 & 80mm fracs -- The El Cheapo Bros.
∞ Mounts: iOptron CEM70AG, SW EQ6R, Celestron AVX, SLT & GT (Alt-Az), Meade DS2000
∞ Cameras: #1: ZWO ASI294MC Pro #2: 662MC #3: 120MC, Canon T3i, Orion SSAG, WYZE Cam3
∞ Binos: 10X50,11X70,15X70, 25X100 ∞ AP Gear: ZWO EAF and mini EFW and the Optolong L-eXteme filter
∞ EPs: ES 2": 21mm 100° & 30mm 82° Pentax XW: 7, 10, 14, & 20mm 70°
Searching the skies since 1966. "I never met a scope I didn't want to keep."
∞ AP Scopes: #1: TPO 6" f/9 RC #2: ES 102 f/7 APO #3: ES 80mm f/6 APO
∞ G&G Scopes: #1: Meade 102mm f/7.8 #2: Bresser 102mm f/4.5
∞ Guide Scopes: 70 & 80mm fracs -- The El Cheapo Bros.
∞ Mounts: iOptron CEM70AG, SW EQ6R, Celestron AVX, SLT & GT (Alt-Az), Meade DS2000
∞ Cameras: #1: ZWO ASI294MC Pro #2: 662MC #3: 120MC, Canon T3i, Orion SSAG, WYZE Cam3
∞ Binos: 10X50,11X70,15X70, 25X100 ∞ AP Gear: ZWO EAF and mini EFW and the Optolong L-eXteme filter
∞ EPs: ES 2": 21mm 100° & 30mm 82° Pentax XW: 7, 10, 14, & 20mm 70°
Searching the skies since 1966. "I never met a scope I didn't want to keep."
Create an account or sign in to join the discussion
You need to be a member in order to post a reply
Create an account
Not a member? register to join our community
Members can start their own topics & subscribe to topics
It’s free and only takes a minute