
Up until recently I had been using a
1) When the WBPP script is first opened it will look similar to the screen shot below. For this image the Bias tab along the top has been selected.

Notice the Global Options box toward the lower right hand corner. The checked boxes are the proper ones for my ASI1600MM Pro camera. Make sure the Optimize dark frames box is NOT checked.
2) Bias Frames. NO BIAS FRAMES ARE USED FOR
3) Click on the Lights tab along the top and then click on the Add Lights button along the bottom. Navigate to where the Light frames are located. Select the light frames and click on the Open button. The selected frames will show up in the WBPP display. Navigate to the next group of Light frames and add them. Continue until all Light frames have been added. The screen shot below shows that the R, G, and B Light frames have all been added. Notice that the frames have been grouped by filter type. WBPP does the grouping automatically assuming the Fits Headers have the required information.

The Output Directory box in the lower right hand corner is a required entry. Navigate to and select the location where you want the WBPP results to be stored.
There are three other boxes that I have checked on the Lights tab.
a) Generate subframe weights:: checking this box will weight each image according to the image quality. See Adam's tutorials for a full explanation of this choice.
Because I normally allow WBPP to Register the calibrated images and then Integrate them:
b) Use best frame as reference for registration: The "highest quality" image is used as the reference for registering all images. If this box isn't checked then you need to go to the Registration Reference Image box and navigate to and select the image to be used as the reference.
c) Checking the Apply box in the Image Integration section will integrate the frames after they are registered. Each channel will be integrated separately.
4) Click on the Flats tab along the top and then click on the Add Flats button along the bottom. Navigate to where the Flat frames are located. Select the Flat frames and click on the Open button. The selected frames will show up in the WBPP display. Navigate to the next group of Flat frames and add them. Continue until all Flat frames have been added. The screen shot below shows that the R, G, and B Flat frames have all been added. Notice that the frames have been grouped by filter type (R, G, B), and, each filter type has a different exposure time (0.09, 0.12 and 0.20 sec).
5) Click on the Darks tab along the top and then click on the Add Darks button along the bottom. For this tutorial all of the Light frames used an exposure time of 150 sec, so, navigate to where the 150 sec Dark frames are located. Select the Dark frames and click on the Open button. The selected frames will show up in the WBPP display. If the Light frames for the different channels had different exposure times, then, there would need to be matching dark frames for each exposure. You should not "optimize" dark frames to match different exposure times for
6) Flat Darks. Flat Darks are just Dark frames but with an exposure that exactly matches the Flat frames. Because Flat frames for different filters will generally have different exposure times there will generally be a different set of Flat Dark frames for each set of Flats.
The screen shot below shows the 150 sec Darks for the Light frames and three separate groups of Flat Darks (one for R, G and B filters).
7) Once all the files are added to WBPP click the Diagnostics button along the bottom. A screen like the one below will be displayed.

If anything is missing or if there are any warnings they will show up here. Click OK, fix any real problems and try the Diagnostics button again.
In this case we don't want any Bias frames, so, no problem. Just click on OK.
8) Click on the Run button. When the Diagnostics window pops up again, click on Continue and wait until WBPP finishes and the window below pops up.
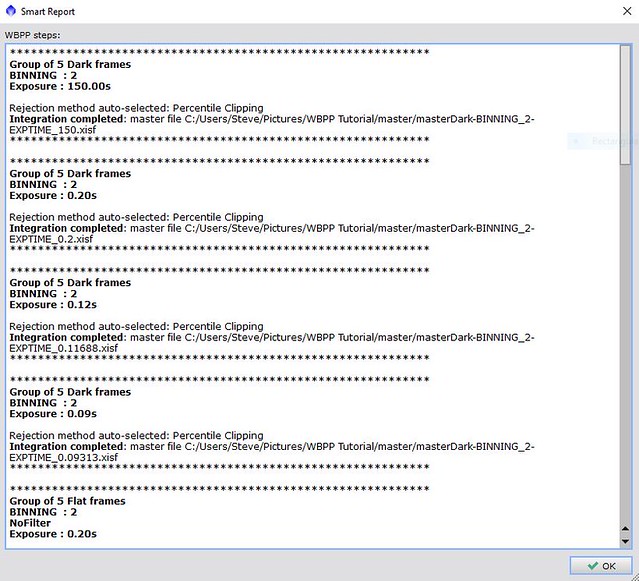
This window contains a brief summary of all that was accomplished by the pre-processing. I don't normally read all this.
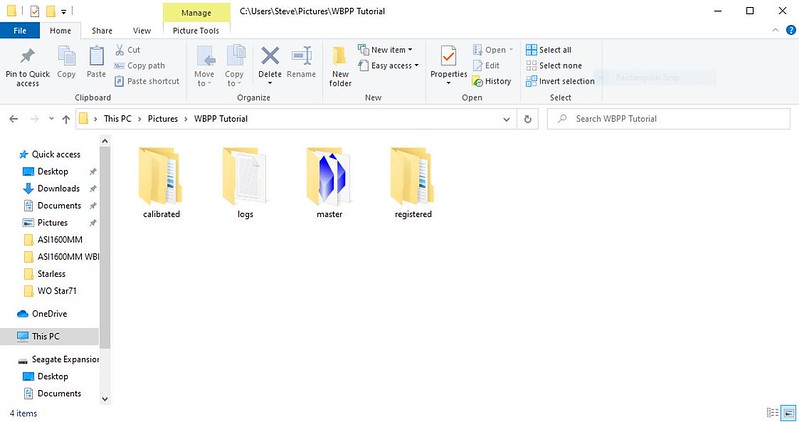
9) Navigate to the designated Output Directory and you should see four folders as shown below.
Opening the Master folder you should see something like what is shown below.

For our tutorial it created Master Flat Darks for the R/G/B filters as well as a Master Dark for the 150 sec exposure Light frames. It also created Master Flats for the R/G/B filters. And finally, it created Master integrated images for the R/G/B filters. It should be noted that the Master integrated images are all registered to one another.
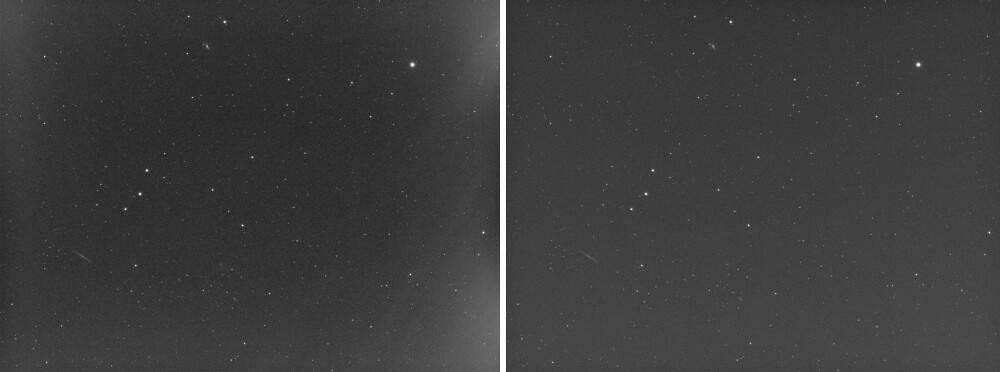
Below is a comparison of a single uncalibrated Light frame of data with the same frame after it has been calibrated with Dark and Flat frames. The calibration was carried out using WBPP as described above. The Dark frames removed the amp glow and the Flats did a nice job of making the entire
Hope this helps.
Steve