
I've had my new CEM40 EC mount for a little over a week now and have completed setup. The weather has been poor since the mount arrived, and, the next few days don't look promising. So, thought I would start the review with what I've learned so far. This is Part 1 of a 2 part review. Part 2 will deal with the actual Polar Alignment and guiding performance (if and when the weather ever cooperates).
TAKING MOUNT OUT OF CASE
Before taking the mount out of the case you should read the Quick Start Guide which can be found at the link below. When my mount arrived it was in a very nice metal case. However, the Quick Start Guide was not included.
https://www.ioptron.com/v/Manuals/7400_CEM40_QSG.pdf
The CEM40 mount comes with a tripod (1 1/2" std), Hand Controller, built in iPolar system (Polar Alignment system similar to Pole Master), GPS module, 10 lb counter weight, and a few cables. The weight of the tripod + mount + counterweight bar is 29.2 lbs. Getting close to my limit, but, still able to get it up/down the mobile home stairs.
MOUNT
The picture below shows the CEM40 EC mount (along with book cases, dirty carpet, etc.).

The large red knob toward the upper right of the mount is the
The Dovetail Saddle can be configured (by the user) to accept either a Vixen or Losmandy dovetail slide while keeping both styles centered on the mount. Mine came configured for a Vixen dovetail.
Since I haven't had a chance to do any guiding (bad weather), not able to comment yet on any benefits that may come from the encoders. Really looking forward to seeing if/how these impact
HAND CONTROLLER
The Hand Controller has all the stars and
CABLE MANAGEMENT
The advertised cable management features were part of the reason I purchased this mount. It turns out, the cable management capabilities are even better than I had anticipated. There is an opening in the middle of the dovetail saddle (see first picture below which shows three cables already inserted into the opening) that allows cables to be run through the mount to either the back of the


I have two Dew Heater cables and the video cable from the guide camera routed through this opening. I have brought these cables out at the back of the
On the back end of the dovetail saddle there is a pre wired Cable Management Panel (CMP) shown in the image below.

This panel has three connections: USB, Guide, and a DC 12V power connection. This Panel can be moved to the front of the dovetail saddle if desired. The ST4 cable from my autoguider plugs into the GUIDE (ST4) connector on the CMP. The cable from my

The picture below shows a rear view of the completely cabled setup. The red arrows show the two ends of the

The picture below shows a side view of the completely cabled setup. Notice that no long cables are hanging off of the telescope itself! All of the cables leaving the mount are coming out of the rear of the

GPS SYSTEM
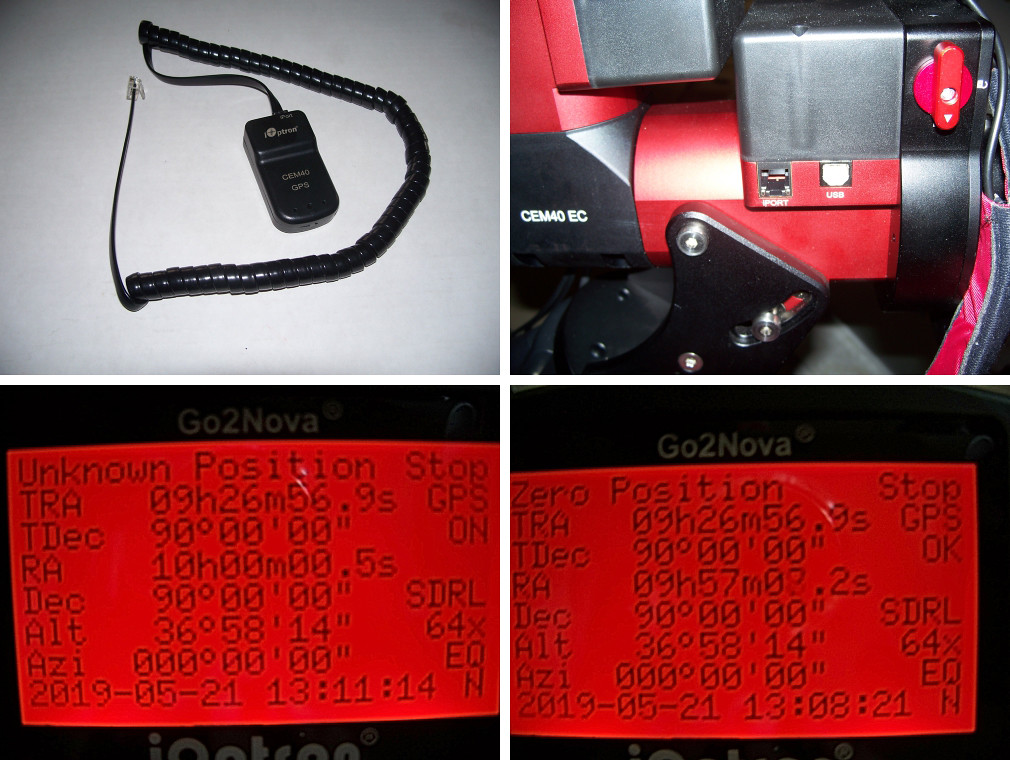
The GPS system consists of the GPS module and it's coiled cable with an ST4 connector (top left picture below). After the mount is setup and connected to the telescope and turned on, the ST4 connector is plugged into the IPORT connector on the side of the mount (top right picture below). Once the GPS is plugged into the mount, the upper right corner of the hand controller display will show GPS ON as shown in the bottom left picture below. Once the GPS has determined your current time and location it will beep, and, the hand controller message changes from GPS ON to GPS OK (as shown in the bottom right picture below). The GPS information is automatically sent to the Hand Controller. At that point the GPS can be disconnected and put away till next time. Very easy to use.
iPolar SYSTEM
You can get the CEM40 (CEM40 EC) with or without the iPolar system. My mount came with the iPolar system. The iPolar system aids you in achieving Polar alignment. It is located in the center of the front of the

To setup iPolar:
1) Connect the iPolar usb connector (located on the rear of the
2) Go to the link below and download the iPolar software to your laptop.
https://www.ioptron.com/product-p/3339.htm
3) The iPolar Manual can be downloaded from the link below, and, the instructions are easy to follow.
http://www.ioptron.com/v/manuals/3339_i ... Manual.pdf
One nice thing about using iPolar is that you only need to take the three images the first time you use it. The three images are used to determine the center of rotation of the mount, and, since the iPolar system is mechanically tied to the mount, the center of rotation doesn't change. That will definitely save time for each use after the first time.
Although I have iPolar up and running, I have not yet been able to test it due to lack of clear skies, so nothing more now for iPolar.
This is as far as I can go until clear skies become available. I really like the cable management so far. Should yield much better mount balancing. The iPolar Polar Alignment system looks quite easy to use from the descriptions and one video I saw. However, haven't had a chance to actually use it myself or see how accurate it is. Many interesting parts of this review yet to come.
Hope this helps.
Comments/Questions welcomed.
Steve