I say, "almost everything set up right," because the camera settings I used to capture the images were far from correct. So all the information (photons) I collected was crammed to the left side of a histogram that shows the distribution of pixel intensity. In other words, I had very few details, a bunch of overexposed areas, and almost no solid black in the sky (which I could have prevented with high contrast or light pollution filters).
Thanks to the weather, I've had time to play around with the frames I did get with slowly improving results thanks to a lot of reading and a few nuggets embedded in far too long YouTube videos.
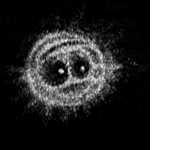
I used SharpCap to capture the images and it does real-time stacking and alignment so you can see what's what and save what's on the screen if you like it. Here, for example, is one image created from six 90-second frames.
After I put the scope away, I tried playing with it using SharpCap's post-processing tools and ruined it
Three days ago I decided to try post-processing in Adobe Lightroom with this ugly result
Yesterday, after some more reading and fiddling, I was able to create something a little nicer
Today I tried using Photoshop and produced this which is slightly better.
So as my title suggests, one day at a time my results are getting better.
The key takeaways are
- You have to start with good subs
- The software you use, like the hardware, makes a big difference in ease of use and results
- Most edits require very small changes
- The real objective is to improve the contrast to reveal very dim details
- Post-processing is an art that requires a lot reading, practice and mistakes, trial and error
- Most video tutorials are far too long and progress far too slowly
- Holding down the ALT key in Lightroom lets you mask highlights
- I need to research available astrophotography add-ons or stand-alone post-processing tools
- The newest addition to the family (rescue dog) will wake up your wife wiggling in delight when you come to bed late after hours of editing