Veil NB mosaic project

Discuss how you are able to get those fantastic images!!!
Post Reply
User avatar
ram United States of America
Saturn Ambassador
Articles: 0
Offline
Posts: 350
Joined: Tue Jun 11, 2019 3:21 am
4
Location: Youngstown, NY, USA
Status:
Offline

TSS Photo of the Day

Veil NB mosaic project

#1

Post by ram »


As I mentioned in another thread about the benefits of preprocessing, I'm having trouble with GMM and in general creating a decent mosaic in

My two panels in Ha are here (61 x 360s and 20 x 360s for top and bottom using my SV70T reduced to 0.8 and QHY163M):

http://www.ram.org/images/space/downloa ... Ha.v0.xisf

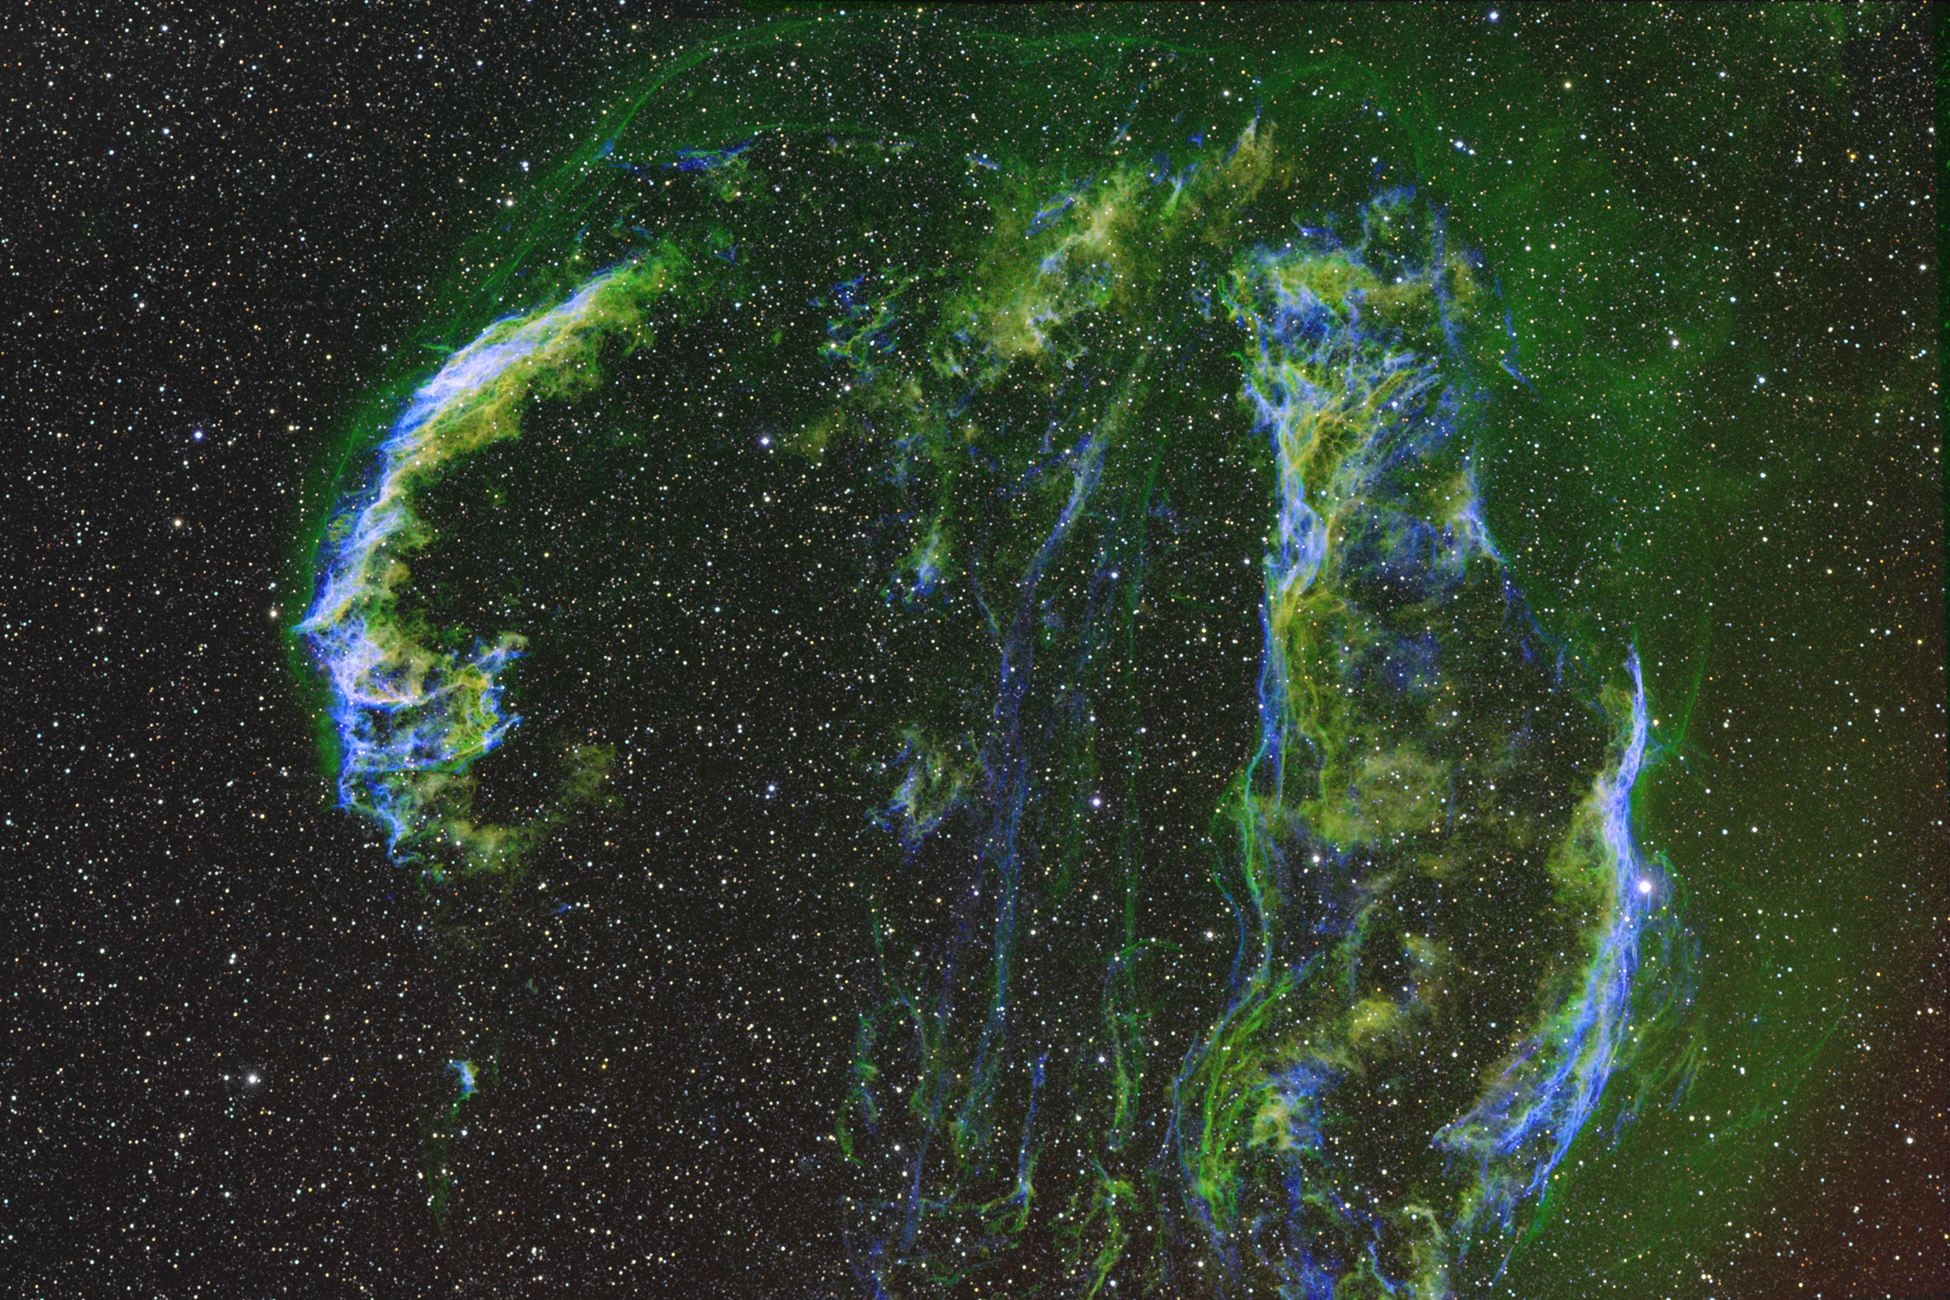
My best merged mosaic of the above two panels (jpeg), no postprocessing of any kind, just STF-AS->HT as is:

http://www.ram.org/images/space/downloa ... _Ha.v0.jpg

It's not too bad and there's still a bit of pinching but it's not in the main nebula area and since it's a PITA to black out all the problematic areas I've left it alone. The GMM parametres used to create the above were using average, shrink radius of 1, feather radius of 250. I tried a bunch of other options (perhaps over 100) including overlay, all the shrink radii from 0-10 and feather radii ranging from 0 to 250 and I've found these to work best in this case. All others produce more pinched stars whereas this is basically pinch free.

The above image was created using star alignment with splines, with register/union separate, frame adaptation checked, pixelmath max used to clean up the black edges and then dnaLinearFit and then GMM.

There are many ways to create a mosaic. One involves creating a star field and projecting your images onto there and then merging them with GMM and the other involves just star alignment and then combining with GMM. The first approach you'd think would work better but it creates too many pinched stars in my case. The second approach works better and creates fewer pinched stars which can be dealt with. There's still one perhaps two pinched stars in the current image but I could fix it as long as there's not any more preprocessing left to do (it involves blacking out the problematic areas with pixelmath which is a PITA so I'm holding off until I'm sure the Ha image is finalised). Also here the Ha frames were created using simply calibration, registration and integration. No LN and Drizzle but like I said, I tried all of those and didn't find the results that much different.

No post processing of any kind yet - just STF->HT. Still some gradients but not too bad I think especially once I darken things a bit.

I guess I always have the top half of the mosaic if I want to produce a cleaner image. Let me know what you think and if you have any suggestions. I'm trying to bring out the faint wisps beyond the main nebula areas which is in Ha. See this image for reference: http://bf-astro.com/veil/veilhub.jpg

I do have 20 frames of Ha (out of the 61) where the faint wispy regions (at the top / right) are prominent since those were done in pure darkness so I know the data is there but just a matter of bringing it out. It's not what most images of veil I've seen focus on but given that I didn't do it at a dark site I think it's pretty cool I was able to get it. Most of my imaging was done with the moon out these past few days so that's partly responsible for the gradients.

Worst case, I could just stick to the top half and I'd still have a decent NB image but I really would like to get this mosaic right. I also can put up the xisf files at various stages (for instance just before GMM) if it'll make your life easier, for those who want to work with these images.

Thanks a lot!

--Ram
Tubes: Celestron 9.25" 235mm f/10 XLT EdgeHD SCT; Meade ETX 80mm f/5 achromat; Coronado SolarMax II 60mm f/6.6 Hα <0.7Å BF10 solar; Stellarvue 70mm f/6 triplet apochromat; Obsession UC18 457mm f/4.2 with Argo Navis & ServoCAT; Takahashi FS128 5" f/8.1 and FC100DF 4" f/7.4 fluorite doublet apochromats. Mounts: AVX; LXD75; Paramount MyT. Eyepieces: 2" Tele Vue Ethos 4.7/13/21mm, Paracorr, 2,4x Powermate; Stellarvue 0.8x, Takahashi 0.7x, 0.66x reducer/corrector. Cameras: ZWO ASI120MC-S; Lodestar X2c; X2m; Canon T7i; QHY163M; QHY247C; QHY294M-Pro. Filters: 1.25" Astrodon 5nm Ha, 3nm O3 and S2; Chroma LRGB.
Image
User avatar
ram United States of America
Saturn Ambassador
Articles: 0
Offline
Posts: 350
Joined: Tue Jun 11, 2019 3:21 am
4
Location: Youngstown, NY, USA
Status:
Offline

TSS Photo of the Day

Re: Veil NB mosaic project

#2

Post by ram »


Here are some additional questions I have for those who have done mosaics:

1. Should I now align the individual O3 and S2 subs (both panels) to this Ha mosaic or just do them all separately and then align the O3 and S2 mosaics to this one?

2. If you look at the area where there is pinching (bottom half, to the left) the stars are distorted so it looks like the registration wasn't perfect. When I take the two registered frames and do the max function on them I see this also, so star alignment wasn't perfect in this regard. Is there anything I can do to produce a better registration? I used the splines approach and checked "distortion correction". I also checked frame adaptation but there's no point since dnaLinearFit redoes that. (Also as I said, fitting to a star field covering this mosaic creates even more misses which results in more problems while using GMM.)

3. If I can't produce a better alignment, I could just black out that whole area since there's like 35% overlap. In fact, I could reduce the overlap to about 20% by just blacking out the pixels. Or is it better to redo the star alignment but with the cropped image?

IMO, my usual philosophy has been to find the right camera/scope/reducer combo for a target and not do mosaics. I'm beginning to see why that was a wise choice. I've really had a frustrating time with all of this (the individual images themselves are pretty good I think) so any help is greatly appreciated.

--Ram
Tubes: Celestron 9.25" 235mm f/10 XLT EdgeHD SCT; Meade ETX 80mm f/5 achromat; Coronado SolarMax II 60mm f/6.6 Hα <0.7Å BF10 solar; Stellarvue 70mm f/6 triplet apochromat; Obsession UC18 457mm f/4.2 with Argo Navis & ServoCAT; Takahashi FS128 5" f/8.1 and FC100DF 4" f/7.4 fluorite doublet apochromats. Mounts: AVX; LXD75; Paramount MyT. Eyepieces: 2" Tele Vue Ethos 4.7/13/21mm, Paracorr, 2,4x Powermate; Stellarvue 0.8x, Takahashi 0.7x, 0.66x reducer/corrector. Cameras: ZWO ASI120MC-S; Lodestar X2c; X2m; Canon T7i; QHY163M; QHY247C; QHY294M-Pro. Filters: 1.25" Astrodon 5nm Ha, 3nm O3 and S2; Chroma LRGB.
Image
User avatar
ram United States of America
Saturn Ambassador
Articles: 0
Offline
Posts: 350
Joined: Tue Jun 11, 2019 3:21 am
4
Location: Youngstown, NY, USA
Status:
Offline

TSS Photo of the Day

Re: Veil NB mosaic project

#3

Post by ram »


Here's the image with DBE and then HT manually done - this is how I'd manipulate the green channel once I a SHO-RGB combination (I already tried it with just the top panel and it captures the green wispy bits seen in the bf-astro images quite well). Nonetheless, the main point is that the background gradients seem to have diminished and the seam looks a lot better:

http://www.ram.org/images/space/downloa ... a.v0.1.jpg

--Ram
Tubes: Celestron 9.25" 235mm f/10 XLT EdgeHD SCT; Meade ETX 80mm f/5 achromat; Coronado SolarMax II 60mm f/6.6 Hα <0.7Å BF10 solar; Stellarvue 70mm f/6 triplet apochromat; Obsession UC18 457mm f/4.2 with Argo Navis & ServoCAT; Takahashi FS128 5" f/8.1 and FC100DF 4" f/7.4 fluorite doublet apochromats. Mounts: AVX; LXD75; Paramount MyT. Eyepieces: 2" Tele Vue Ethos 4.7/13/21mm, Paracorr, 2,4x Powermate; Stellarvue 0.8x, Takahashi 0.7x, 0.66x reducer/corrector. Cameras: ZWO ASI120MC-S; Lodestar X2c; X2m; Canon T7i; QHY163M; QHY247C; QHY294M-Pro. Filters: 1.25" Astrodon 5nm Ha, 3nm O3 and S2; Chroma LRGB.
Image
User avatar
JimMinCT United States of America
Saturn Ambassador
Articles: 0
Offline
Posts: 393
Joined: Tue May 07, 2019 10:24 pm
4
Location: Ct
Status:
Offline

TSS Awards Badges

TSS Photo of the Day

Re: Veil NB mosaic project

#4

Post by JimMinCT »


Not for nothing, but we moved about 1000 people over to this forum so we could post images... :D
I'd much rather be able to see the images in the thread rather than have to follow the links.
I can understand not posting the xisf files due to the size, but it would be a big help if you could attach the jpgs so we could see them instead of the links...

Thanks!
OTA's: Kson 1026-C, 4" Carbon Fiber ED Refractor, Home-built, 6.1", f/2.? APO refractor... (In Progress) 8" Meade LX2 SCT Mounts: CGX Imaging: ZWO ASI 1600MM, Canon 550D (T2i) Software: PixInsight, APT, PHD2, SharpCap, SGP, Stellarium, Registax, Stuff: Astro-Tech 0.8x FR/FF, Hotech SCA FF, ZWO 7nm 31mm LRGB-SHO filter set, ZWO 8 position EFWObsy: "Maybe Spaceship" Observatory
Image
User avatar
ram United States of America
Saturn Ambassador
Articles: 0
Offline
Posts: 350
Joined: Tue Jun 11, 2019 3:21 am
4
Location: Youngstown, NY, USA
Status:
Offline

TSS Photo of the Day

Re: Veil NB mosaic project

#5

Post by ram »


You mean just insert them with the img tag? I did try to upload the full image as an attachment but even though it was green, it failed. But anyways, here's the the recent image with DBE applied and then darkened a bit (probably how much I'll reduce the green channel once I colour combine into SHO):

Image

and here's the original without DBE and after GMM.

Image

--Ram
Tubes: Celestron 9.25" 235mm f/10 XLT EdgeHD SCT; Meade ETX 80mm f/5 achromat; Coronado SolarMax II 60mm f/6.6 Hα <0.7Å BF10 solar; Stellarvue 70mm f/6 triplet apochromat; Obsession UC18 457mm f/4.2 with Argo Navis & ServoCAT; Takahashi FS128 5" f/8.1 and FC100DF 4" f/7.4 fluorite doublet apochromats. Mounts: AVX; LXD75; Paramount MyT. Eyepieces: 2" Tele Vue Ethos 4.7/13/21mm, Paracorr, 2,4x Powermate; Stellarvue 0.8x, Takahashi 0.7x, 0.66x reducer/corrector. Cameras: ZWO ASI120MC-S; Lodestar X2c; X2m; Canon T7i; QHY163M; QHY247C; QHY294M-Pro. Filters: 1.25" Astrodon 5nm Ha, 3nm O3 and S2; Chroma LRGB.
Image
User avatar
JimMinCT United States of America
Saturn Ambassador
Articles: 0
Offline
Posts: 393
Joined: Tue May 07, 2019 10:24 pm
4
Location: Ct
Status:
Offline

TSS Awards Badges

TSS Photo of the Day

Re: Veil NB mosaic project

#6

Post by JimMinCT »


No, at the bottom of the page where you type a reply, hit the full editor button.
There's an add attachment button and the rest is easy peasy...

What do your flats look like, and can you post a master flat?
You have serious gradients that the flats should have cured.
Here's what I came up with
Rams loop small.jpg
OTA's: Kson 1026-C, 4" Carbon Fiber ED Refractor, Home-built, 6.1", f/2.? APO refractor... (In Progress) 8" Meade LX2 SCT Mounts: CGX Imaging: ZWO ASI 1600MM, Canon 550D (T2i) Software: PixInsight, APT, PHD2, SharpCap, SGP, Stellarium, Registax, Stuff: Astro-Tech 0.8x FR/FF, Hotech SCA FF, ZWO 7nm 31mm LRGB-SHO filter set, ZWO 8 position EFWObsy: "Maybe Spaceship" Observatory
Image
User avatar
JimMinCT United States of America
Saturn Ambassador
Articles: 0
Offline
Posts: 393
Joined: Tue May 07, 2019 10:24 pm
4
Location: Ct
Status:
Offline

TSS Awards Badges

TSS Photo of the Day

Re: Veil NB mosaic project

#7

Post by JimMinCT »


If you ever want the most honest view of an image... Open range selection and look at the preview window. Every defect shows up in blinding black and white.
rams screen shot.jpg
OTA's: Kson 1026-C, 4" Carbon Fiber ED Refractor, Home-built, 6.1", f/2.? APO refractor... (In Progress) 8" Meade LX2 SCT Mounts: CGX Imaging: ZWO ASI 1600MM, Canon 550D (T2i) Software: PixInsight, APT, PHD2, SharpCap, SGP, Stellarium, Registax, Stuff: Astro-Tech 0.8x FR/FF, Hotech SCA FF, ZWO 7nm 31mm LRGB-SHO filter set, ZWO 8 position EFWObsy: "Maybe Spaceship" Observatory
Image
User avatar
ram United States of America
Saturn Ambassador
Articles: 0
Offline
Posts: 350
Joined: Tue Jun 11, 2019 3:21 am
4
Location: Youngstown, NY, USA
Status:
Offline

TSS Photo of the Day

Re: Veil NB mosaic project

#8

Post by ram »


I did go to the full editor and clicked on add attachment and as I said, it turned green and then a single pop up message saying "Error" came up (that's all it said).

I use the range selection also. Did you look at the DBE image I generated with range selection?

The image you generated looks better than the DBE image I generated (v0.1)! Did you do anything other than DBE and if so what did you did do and is there any particular way you did DBE that can help me replicate what you did with the XISF file? Thanks man.

IMO, the gradients are due to imaging in moon light (in part) and in part due to using a different number of exposures for the bottom panel than the top (the top is where most of the faint information is). The moon goes by the back of my house and for the most part it doesn't shine on the scope but when it does and as it passes by, it does change the brightness of the image. I did manage to capture 20 frames for the top part without any moonlight whatsoever and they are darker and I did do a frame adaptation to the best of this while during the star alignment. But it's still present when I integrate obviously.

I normally don't use flats since I keep my optical train super clean and I've not found it to help at all in the past. But my entire optical train is still in one piece (scope/camera/filters/everything). So I can generate a master flat and post a link to it and upload the JPEG. Stay tuned...

Do you see any issues with the GMM where the two panels merge (though I've now cleaned up a couple of the pinched stars) and with regards to aligning the other filter frames, should I align to this mosaic or do them separately and align the whole mosaic at once (most tutorials I've read seem to advocate the latter which may be necessary anyway). Thoughts on those?

Thanks again!

-Ram
Tubes: Celestron 9.25" 235mm f/10 XLT EdgeHD SCT; Meade ETX 80mm f/5 achromat; Coronado SolarMax II 60mm f/6.6 Hα <0.7Å BF10 solar; Stellarvue 70mm f/6 triplet apochromat; Obsession UC18 457mm f/4.2 with Argo Navis & ServoCAT; Takahashi FS128 5" f/8.1 and FC100DF 4" f/7.4 fluorite doublet apochromats. Mounts: AVX; LXD75; Paramount MyT. Eyepieces: 2" Tele Vue Ethos 4.7/13/21mm, Paracorr, 2,4x Powermate; Stellarvue 0.8x, Takahashi 0.7x, 0.66x reducer/corrector. Cameras: ZWO ASI120MC-S; Lodestar X2c; X2m; Canon T7i; QHY163M; QHY247C; QHY294M-Pro. Filters: 1.25" Astrodon 5nm Ha, 3nm O3 and S2; Chroma LRGB.
Image
User avatar
JimMinCT United States of America
Saturn Ambassador
Articles: 0
Offline
Posts: 393
Joined: Tue May 07, 2019 10:24 pm
4
Location: Ct
Status:
Offline

TSS Awards Badges

TSS Photo of the Day

Re: Veil NB mosaic project

#9

Post by JimMinCT »


[*]Don't use a jpg for the flat! It needs to be a real xisf file. Identical to the others posted.
BTW, you have some great data... Taking flats will make sure you can get the most out of it.
You also have a bunch of edge issues that flats would correct and make life easier for processing.

The dark gradient is exactly the same in both the top and bottom images, leading me to believe it can be removed with flats. No harm in trying...

The first thing I did was compare the two images under high power (6:1- 10:1) to get a good look at the Background level noise.
I then used TGVDenoise to make the bottom panel noise level match the top panel.
Once the two panels matched, I cropped them both to remove stragglers and did a quick mosaic registration.

After figuring out which panel should drop onto which, i made a frame and created a proper mosaic for GMM to work with.
Again I had to swap the drop order of the images to get the best match.
Shrink radius 9, feather radius 28, using the overlay method.
I don't see any pinched stars in my attempt, and, combined with the noise level matching, means finding the seam is not as easy as you might think. :D
The rest was normal processing flow using masks and histogram adjustments.
I have since played around more with it and tried DBE. It improved it a lot more.
rams screen shot1.jpg
I'm sure I could get them removed with enough time.
Try increasing the tolerance in model parameters 1 to about 3-3.5 This will remove the "red x's" and turn them grey
Decrease the minimum sample weight to 0.125 on the sample generation tab. See above
Add a bunch of extra sample points along the lines and areas of discoloration. Be sure to get the areas I missed as you can see in the Range selection image... :)
Use subtraction and normalization
Rams loop rev 2 small.jpg


Yeah, mosaics are a lot of fun.
Good Luck!

Underlined text edited in for clarity....
OTA's: Kson 1026-C, 4" Carbon Fiber ED Refractor, Home-built, 6.1", f/2.? APO refractor... (In Progress) 8" Meade LX2 SCT Mounts: CGX Imaging: ZWO ASI 1600MM, Canon 550D (T2i) Software: PixInsight, APT, PHD2, SharpCap, SGP, Stellarium, Registax, Stuff: Astro-Tech 0.8x FR/FF, Hotech SCA FF, ZWO 7nm 31mm LRGB-SHO filter set, ZWO 8 position EFWObsy: "Maybe Spaceship" Observatory
Image
User avatar
JimMinCT United States of America
Saturn Ambassador
Articles: 0
Offline
Posts: 393
Joined: Tue May 07, 2019 10:24 pm
4
Location: Ct
Status:
Offline

TSS Awards Badges

TSS Photo of the Day

Re: Veil NB mosaic project

#10

Post by JimMinCT »


Here's a shot of the DBE screen.
rams screen shot2.jpg
OTA's: Kson 1026-C, 4" Carbon Fiber ED Refractor, Home-built, 6.1", f/2.? APO refractor... (In Progress) 8" Meade LX2 SCT Mounts: CGX Imaging: ZWO ASI 1600MM, Canon 550D (T2i) Software: PixInsight, APT, PHD2, SharpCap, SGP, Stellarium, Registax, Stuff: Astro-Tech 0.8x FR/FF, Hotech SCA FF, ZWO 7nm 31mm LRGB-SHO filter set, ZWO 8 position EFWObsy: "Maybe Spaceship" Observatory
Image
User avatar
ram United States of America
Saturn Ambassador
Articles: 0
Offline
Posts: 350
Joined: Tue Jun 11, 2019 3:21 am
4
Location: Youngstown, NY, USA
Status:
Offline

TSS Photo of the Day

Re: Veil NB mosaic project

#11

Post by ram »


Thank you so much!

Yeah, I will go do the flats tonight - as you say, it can't hurt. If it was that easy for you to combine the two panels using GMM without correcting for pinching I have no problems with repeating the steps with the flats and seeing what happens. (The JPEG was just for posting on the forum, as you requested. :) ) The most time consuming part of this so far has been the GMM - I spent two days trying to figure out the optimal parametres that would create a mosaic without pinching and in the end had 2-3 pinched stars I manually corrected. So I will redo with the flats and try your process above and hope the GMM goes better this time.

Before I did GMM, I did dnaLinearFit but you used TGVdenoise to match the panels so I wonder if that was the primary difference. Anyways, I'll give it a whirl once I collect my flats for all three filters tonight.

--Ram
Tubes: Celestron 9.25" 235mm f/10 XLT EdgeHD SCT; Meade ETX 80mm f/5 achromat; Coronado SolarMax II 60mm f/6.6 Hα <0.7Å BF10 solar; Stellarvue 70mm f/6 triplet apochromat; Obsession UC18 457mm f/4.2 with Argo Navis & ServoCAT; Takahashi FS128 5" f/8.1 and FC100DF 4" f/7.4 fluorite doublet apochromats. Mounts: AVX; LXD75; Paramount MyT. Eyepieces: 2" Tele Vue Ethos 4.7/13/21mm, Paracorr, 2,4x Powermate; Stellarvue 0.8x, Takahashi 0.7x, 0.66x reducer/corrector. Cameras: ZWO ASI120MC-S; Lodestar X2c; X2m; Canon T7i; QHY163M; QHY247C; QHY294M-Pro. Filters: 1.25" Astrodon 5nm Ha, 3nm O3 and S2; Chroma LRGB.
Image
User avatar
JimMinCT United States of America
Saturn Ambassador
Articles: 0
Offline
Posts: 393
Joined: Tue May 07, 2019 10:24 pm
4
Location: Ct
Status:
Offline

TSS Awards Badges

TSS Photo of the Day

Re: Veil NB mosaic project

#12

Post by JimMinCT »


ram wrote: Thu Jul 18, 2019 1:46 am Thank you so much!

Yeah, I will go do the flats tonight - as you say, it can't hurt. If it was that easy for you to combine the two panels using GMM without correcting for pinching I have no problems with repeating the steps with the flats and seeing what happens.

--Ram
Le sigh.... (It's only easy once shown, or after spending the time playing with the sliders to figure out what does what.) :)

If you don't already have it, Warren Keller has a book out on PI. I learned the bulk of what I know before his book came out,
but he does include in-depth screenshots and tutorials on this, and a slew of other valuable processes and tools.
Inside Pixinsight is the title, and it's a decent read with a lot of tidbits that are probably worth the price of the book alone.
OTA's: Kson 1026-C, 4" Carbon Fiber ED Refractor, Home-built, 6.1", f/2.? APO refractor... (In Progress) 8" Meade LX2 SCT Mounts: CGX Imaging: ZWO ASI 1600MM, Canon 550D (T2i) Software: PixInsight, APT, PHD2, SharpCap, SGP, Stellarium, Registax, Stuff: Astro-Tech 0.8x FR/FF, Hotech SCA FF, ZWO 7nm 31mm LRGB-SHO filter set, ZWO 8 position EFWObsy: "Maybe Spaceship" Observatory
Image
User avatar
JimMinCT United States of America
Saturn Ambassador
Articles: 0
Offline
Posts: 393
Joined: Tue May 07, 2019 10:24 pm
4
Location: Ct
Status:
Offline

TSS Awards Badges

TSS Photo of the Day

Re: Veil NB mosaic project

#13

Post by JimMinCT »


ram wrote: Thu Jul 18, 2019 1:46 am Thank you so much!

Yeah, I will go do the flats tonight - as you say, it can't hurt. If it was that easy for you to combine the two panels using GMM without correcting for pinching I have no problems with repeating the steps with the flats and seeing what happens. (The JPEG was just for posting on the forum, as you requested. :) ) The most time consuming part of this so far has been the GMM - I spent two days trying to figure out the optimal parametres that would create a mosaic without pinching and in the end had 2-3 pinched stars I manually corrected. So I will redo with the flats and try your process above and hope the GMM goes better this time.

Before I did GMM, I did dnaLinearFit but you used TGVdenoise to match the panels so I wonder if that was the primary difference. Anyways, I'll give it a whirl once I collect my flats for all three filters tonight.

--Ram
I did TGV because of the large disparity between the two panels. I have had to work with this very same issue more times than I want to remember... :D
Linear fit can work on some images better than TGV. It's just another tool in the box...
I'm comfortable working with it, and know what the parameters are doing when I adjust them.
It allows me to tailor the level of noise to match the other panel.
OTA's: Kson 1026-C, 4" Carbon Fiber ED Refractor, Home-built, 6.1", f/2.? APO refractor... (In Progress) 8" Meade LX2 SCT Mounts: CGX Imaging: ZWO ASI 1600MM, Canon 550D (T2i) Software: PixInsight, APT, PHD2, SharpCap, SGP, Stellarium, Registax, Stuff: Astro-Tech 0.8x FR/FF, Hotech SCA FF, ZWO 7nm 31mm LRGB-SHO filter set, ZWO 8 position EFWObsy: "Maybe Spaceship" Observatory
Image
User avatar
ram United States of America
Saturn Ambassador
Articles: 0
Offline
Posts: 350
Joined: Tue Jun 11, 2019 3:21 am
4
Location: Youngstown, NY, USA
Status:
Offline

TSS Photo of the Day

Re: Veil NB mosaic project

#14

Post by ram »


Before I go too far with the flats, previously I used an ipad and had it pressed flush to the scope but now that ipad no longer works and my Mac is what I can use. I can get it very close to the scope (like less than half inch away) but not flush since the dovetail is getting in the way. I am pretty sure the scope's FOV is entirely focussed on the Mac screen but I wonder if the air gap can influence the image or if I should have pressed flush. If it is flush then I have to think of something else to do the flats capture. Or perhaps I can do it in a well lit room and not have it be pressed flush.

My understanding with flats exposure is that the histogram has to be in the middle somewhere. I have some overexposed flats and they look VERY flat.

--Ram
Tubes: Celestron 9.25" 235mm f/10 XLT EdgeHD SCT; Meade ETX 80mm f/5 achromat; Coronado SolarMax II 60mm f/6.6 Hα <0.7Å BF10 solar; Stellarvue 70mm f/6 triplet apochromat; Obsession UC18 457mm f/4.2 with Argo Navis & ServoCAT; Takahashi FS128 5" f/8.1 and FC100DF 4" f/7.4 fluorite doublet apochromats. Mounts: AVX; LXD75; Paramount MyT. Eyepieces: 2" Tele Vue Ethos 4.7/13/21mm, Paracorr, 2,4x Powermate; Stellarvue 0.8x, Takahashi 0.7x, 0.66x reducer/corrector. Cameras: ZWO ASI120MC-S; Lodestar X2c; X2m; Canon T7i; QHY163M; QHY247C; QHY294M-Pro. Filters: 1.25" Astrodon 5nm Ha, 3nm O3 and S2; Chroma LRGB.
Image
User avatar
ram United States of America
Saturn Ambassador
Articles: 0
Offline
Posts: 350
Joined: Tue Jun 11, 2019 3:21 am
4
Location: Youngstown, NY, USA
Status:
Offline

TSS Photo of the Day

Re: Veil NB mosaic project

#15

Post by ram »


Here's the master flat (though since you're not going to recalibrate, I probably should've uploaded a JPEG anyway):

http://www.ram.org/images/space/downloa ... g_32o.xisf

This is just image integration without dark frame subtraction (on the master flat). This looks almost identical to the Sharpcap generated master flat. Looks like my optical train isn't as clean as I thought but it's also not too bad. I don't see the gradients that are in the images but I am doing the recalibration with the flats.

I tried TGVdenoise and it looks finicky so I hope I get it work as well as you have!

--Ram
Tubes: Celestron 9.25" 235mm f/10 XLT EdgeHD SCT; Meade ETX 80mm f/5 achromat; Coronado SolarMax II 60mm f/6.6 Hα <0.7Å BF10 solar; Stellarvue 70mm f/6 triplet apochromat; Obsession UC18 457mm f/4.2 with Argo Navis & ServoCAT; Takahashi FS128 5" f/8.1 and FC100DF 4" f/7.4 fluorite doublet apochromats. Mounts: AVX; LXD75; Paramount MyT. Eyepieces: 2" Tele Vue Ethos 4.7/13/21mm, Paracorr, 2,4x Powermate; Stellarvue 0.8x, Takahashi 0.7x, 0.66x reducer/corrector. Cameras: ZWO ASI120MC-S; Lodestar X2c; X2m; Canon T7i; QHY163M; QHY247C; QHY294M-Pro. Filters: 1.25" Astrodon 5nm Ha, 3nm O3 and S2; Chroma LRGB.
Image
User avatar
ram United States of America
Saturn Ambassador
Articles: 0
Offline
Posts: 350
Joined: Tue Jun 11, 2019 3:21 am
4
Location: Youngstown, NY, USA
Status:
Offline

TSS Photo of the Day

Re: Veil NB mosaic project

#16

Post by ram »


Hmm, either I did something wrong with my flats but they don't really help that much and if anything they've made the problem around the edges worse. I didn't calibrate my flats by subtracting the master dark, not sure if I should've have. I might have not illuminated the field entirely properly - the corners were a bit darker and then as a result the integrated image has lighter corners but even if I had I don't see the gradient that is present in the master light. Now that gradient is present to a degree in the darks but the moonlight is the real problem IMO.

http://www.ram.org/images/space/downloa ... Ha.v1.xisf

--Ram
Tubes: Celestron 9.25" 235mm f/10 XLT EdgeHD SCT; Meade ETX 80mm f/5 achromat; Coronado SolarMax II 60mm f/6.6 Hα <0.7Å BF10 solar; Stellarvue 70mm f/6 triplet apochromat; Obsession UC18 457mm f/4.2 with Argo Navis & ServoCAT; Takahashi FS128 5" f/8.1 and FC100DF 4" f/7.4 fluorite doublet apochromats. Mounts: AVX; LXD75; Paramount MyT. Eyepieces: 2" Tele Vue Ethos 4.7/13/21mm, Paracorr, 2,4x Powermate; Stellarvue 0.8x, Takahashi 0.7x, 0.66x reducer/corrector. Cameras: ZWO ASI120MC-S; Lodestar X2c; X2m; Canon T7i; QHY163M; QHY247C; QHY294M-Pro. Filters: 1.25" Astrodon 5nm Ha, 3nm O3 and S2; Chroma LRGB.
Image
User avatar
ram United States of America
Saturn Ambassador
Articles: 0
Offline
Posts: 350
Joined: Tue Jun 11, 2019 3:21 am
4
Location: Youngstown, NY, USA
Status:
Offline

TSS Photo of the Day

Re: Veil NB mosaic project

#17

Post by ram »


Also, I have to ask, sorry, what were the settings you used with TGVdenoise to get the two images to match up? Presumably you used the first as the support and worked on the other one?

I believe I mentioned that I played with the sliders on GMM for two days total - must've explored hundreds of combinations. :)

--Ram
Tubes: Celestron 9.25" 235mm f/10 XLT EdgeHD SCT; Meade ETX 80mm f/5 achromat; Coronado SolarMax II 60mm f/6.6 Hα <0.7Å BF10 solar; Stellarvue 70mm f/6 triplet apochromat; Obsession UC18 457mm f/4.2 with Argo Navis & ServoCAT; Takahashi FS128 5" f/8.1 and FC100DF 4" f/7.4 fluorite doublet apochromats. Mounts: AVX; LXD75; Paramount MyT. Eyepieces: 2" Tele Vue Ethos 4.7/13/21mm, Paracorr, 2,4x Powermate; Stellarvue 0.8x, Takahashi 0.7x, 0.66x reducer/corrector. Cameras: ZWO ASI120MC-S; Lodestar X2c; X2m; Canon T7i; QHY163M; QHY247C; QHY294M-Pro. Filters: 1.25" Astrodon 5nm Ha, 3nm O3 and S2; Chroma LRGB.
Image
User avatar
ram United States of America
Saturn Ambassador
Articles: 0
Offline
Posts: 350
Joined: Tue Jun 11, 2019 3:21 am
4
Location: Youngstown, NY, USA
Status:
Offline

TSS Photo of the Day

Re: Veil NB mosaic project

#18

Post by ram »


So I managed to get your process to work pretty smoothly. I did both dnaLinearFit and then TGVdenoise to match up the noise levels and then with GMM the shrink radius of 9 and feather radius of 28 gives me three perhaps pinched stars but with a shrink radius of 10 and a feather radius of 250 it goes away entirely! This is without even cropping the images and there were a few settings which produced a seamless image without pinched stars, and average also works with those settings. So looks like the GMM problem I was having before indeed was the noise differential. So indeed a lot more easier than before where I evaluated scale 0 to 10 for every 10 incremental of feather radius and I found only a few combinations that created 2-3 pinched stars and even those I had to manually fix by blacking out the stars.

The gradients may be more easily dealt with by DBE in the overlay mosaic which preserves the top part of the image almost in its entirety (whereas the previous version had an up and down and up and down gradient).

Thanks - now I need to decide which of these to work on or continue with calibration some more....

--Ram
Tubes: Celestron 9.25" 235mm f/10 XLT EdgeHD SCT; Meade ETX 80mm f/5 achromat; Coronado SolarMax II 60mm f/6.6 Hα <0.7Å BF10 solar; Stellarvue 70mm f/6 triplet apochromat; Obsession UC18 457mm f/4.2 with Argo Navis & ServoCAT; Takahashi FS128 5" f/8.1 and FC100DF 4" f/7.4 fluorite doublet apochromats. Mounts: AVX; LXD75; Paramount MyT. Eyepieces: 2" Tele Vue Ethos 4.7/13/21mm, Paracorr, 2,4x Powermate; Stellarvue 0.8x, Takahashi 0.7x, 0.66x reducer/corrector. Cameras: ZWO ASI120MC-S; Lodestar X2c; X2m; Canon T7i; QHY163M; QHY247C; QHY294M-Pro. Filters: 1.25" Astrodon 5nm Ha, 3nm O3 and S2; Chroma LRGB.
Image
Post Reply

Create an account or sign in to join the discussion

You need to be a member in order to post a reply

Create an account

Not a member? register to join our community
Members can start their own topics & subscribe to topics
It’s free and only takes a minute

Register

Sign in

Return to “Image processing”