The problem with a solar image is that often the histogram is not fully spread across the entire range (0-255)... Thus the contrast across the details is not fully optimized. HDR "toning" was primarily suited for color photographs, but today applications like Photoshop and Lightroom have evolved to the point that a color "photograph" can be infinitely adjusted and the technique has fallen out of favor.
That said, solar imagers generally do not shoot in color. Color is only applied after the monochrome image has been processed. Nonetheless, there is still that lingering lack of histogram range present. Yes, one can apply overall contrast adjustments to make the image appear sharper, but the finer details often suffer and the result is often unrealistic. Applying some old HDR techniques can really make a difference. This takes some practice, but here's a way to get started using nothing but Photoshop...
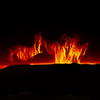
Before you read further, let me show you the end result. Here is an image that I posted yesterday of a couple of active regions...
We are going to start with an image that you have already processed... Make that your Background layer. Next make a Background copy and convert it to a Smart Object.
With the Background copy selected, change its Blend Mode to Linear Light; set the Opacity to 50% and the Fill to 25%. Double-click the right side of the layer to open the Blend Options panel. Since we primarily want to affect the mid-tones, we'll set that panel like this...
Now just two more steps...
With the Background copy highlighted, open the Camera Raw Filter. Under the Basic adjustment section, make the following changes... Contrast +50, Highlights -100, Shadows +100, Whites -100, Blacks +100, Texture +70, Clarity +30, and Dehaze +35. Click OK to close Camera Raw.
The last step is optional, but can be handy. We're going to apply a Curves adjustment layer. Since we're working with a Smart Object, go to Image>Adjustments and select Curves. This will place the Curves adjustment under the Smart Object, again to allow you to tweak it if needed. We're going to very slightly darken the darks and the lights as shown here...
Now you are done adding adjustments to your Smart Object. Before continuing, here is what your layer stack should look like...
There are two sliders in your Background copy that will enable you to adjust the effects created... Fill and Opacity. We initially set them to just get everything else set up below. The Fill slider adjusts the intensity of all the layers below the Smart Object, and Opacity dictates the amount that the layer is applied to your original Background layer. It's sort of a balancing act, but a little experimentation will soon get everything how you like it.
Lastly, just flatten the image and it's ready for showtime.
Again... Before: