
That said, seeing conditions can be so bad when trying to capture a faint prom that the imager is faced with a capture that is going to be next to impossible to process with any degree of success. Adding excessive gain and/or exceedingly high exposures can be frustrating at best.
This technique can “save the day” by allowing the imager to literally raise the prom data from the surface image… Leaving one with the original surface capture and a faux prom capture created during initial processing. Each resulting image can then be processed separately and combined in the customary manner. In this example, we are going to stack using AutoStakkert!3 (twice) and enhance our fine detail using IMPPG… More on IMPPG verses RegiStax later.
The surface capture used in this example was shot during difficult seeing conditions, and a prom capture was going to be unsatisfactory, but I went ahead with the surface capture knowing that this technique would yield a prom image during processing. It is important to note that I was aware of the location of the prom even though I could not see it on the limb… The prom data is there but hidden by the black sky of the properly exposed surface.
Stacking a surface image in AS!3 is simple. After analyzing the graph, one simply decides how many frames to stack and adds the Alignment Points (
There are two ways to create the stack for our prom. This method will ensure the limb area of the prom is properly stacked… Besides, it is easier.
You have finished stacking the surface, and AS!3 “thinks” you are going to add another for stack. No, we are going to add some more alignment points to the image we just stacked. The alignment points used for the surface are still on the screen. Recall I mentioned that I knew where the prom was on the limb. Simply check the “Manual Draw” box to add to the existing points on the surface, as shown in this screenshot…
Manually drawing alignment points is just what it implies. You hold down the left button on the mouse while “drawing” a “point” … Releasing the button draws the point, and you go on to another. Note that the size of the “point” does not really matter, as long as there is some overlap between adjacent points as seen above. Once you have covered the area containing most of the prom, just press “Stack” again to create your new prom stack. (Note: To make life easier for you, stack a slightly different number of frames. That will let AS!3 put your prom stack in a different folder.)
It is time to move on with the process by enhancing the details in either IMPPG or RegiStax. Whichever you use is fine. I prefer IMPPG, but let’s compare & contrast the two applications as they apply to solar imaging. Both provide a method of adjusting the histogram, but IMPPG allows for compound adjustment curves much better that RS. RegiStax adjusts fine details via “Wavelets” while IMPPG uses a Lucy-Richardson deconvolution method. Sharpening in both is basically an UnSharp Mask process, but IMPPG is far superior for solar image sharpening in my opinion. Both are easy to learn but require some study to use well.
When you first place your stacked prom image into IMPPG, you’ll likely think the stacking failed because it will look exactly like your surface image. (That’s why we put the prom stack in a different folder using AS!3.) We’re going to “fix” that right now by making some compound curve adjustments to our histogram as seen below…
See the typical “humpbacked whale” histogram? The proms lie in the far-left area where the “tail” goes vertical. When first opened, the straight adjustment line lies diagonally between the low-left (black) and the upper-right (white) part. By moving that far-left side of the line upward as shown above, the proms you stacked will literally jump out of the surface… Do not worry about what happened to the surface, as that will be covered up by your surface capture that you saved in that other folder after stacking.
The remaining points on that line apply to the now-visible prom itself and are a matter of personal preference. The very last (left) point on the line will remove almost any noise in the sky that was created by over-driving the first (left) point upward. Again, just adjust the image here as much as possible before moving on to the L-R convolution process below…
L-R deconvolution in IMPPG… It should be noted that when first opening the application, both Sigma values are set at 1.3000. That is just a starting value, and many make the mistake of only moving the sliders up in value. In fact, if there is any noise in the prom itself increasing it beyond the initial value will only enhance the noise. Notice in the screenshot below that both Sigma values have been reduced closer to 1.0 and the UnSharp Masking Amount has been reduced to 0.7511. If you want your proms to look like spaghetti, just crank away.
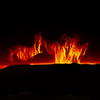
You are now ready to save your newly created prom image for further processing along with the surface in Photoshop, or whatever application you use. Here is a screenshot of the above image married to the surface and colored in Photoshop…
For those who are interested, here’s a quick run-down of the layers shown…
Layer 0 is just the prom image created above. Before using it, I colored the surface “junk” white to keep it from “bleeding” through my color layer (out of the picture)
Layer 0 copy is a Smart Object copy of the first layer. I applied a touch of contrast in Camera Raw and a 0.9-pixel Gaussian Blur to the proms to smooth them somewhat.
The third layer (Curves 1) is Clipped to Layer 0 and was to slightly bump up the luminance of the prom itself. It was added after stitching the surface and was clipped only to the prom layer below it.
Layer 1 is the surface that was selected and pasted on top of the prom and stitched into the right place. An additional (not shown) layer is simply a Color Balance Adjustment Layer that I use for my coloring.
After that it was just flatten and save it.
If you got this far, I thank you for your time and hope this helps somewhere down the road.
Clear Skies