I got a note yesterday from a member asking how to color white light images using Levels in Photoshop. He said that he had always assumed Levels to be for making luminosity adjustments… It is. However, the adjustment can be a quick-and-dirty way to throw on some color to a greyscale, white-light image too.
In this example, I am going to use (with permission) a fine image of AR2781 shot by Mark, aka “Thefatkitty”. It is an excellent example of a well-focused and properly exposed image, just as he posted it in the monochrome version. Adding color is perhaps not necessary, but some like them colored, so let’s get started…
When first loaded into
PS, go to Image>Mode and check
RGB Color then proceed with your normal adjustment routine to bring out the details you captured. We are going to add the color after all the initial processing is completed.
Let’s take a look at the Levels Properties in the example below…

- LEVELS PROPERTIES.jpg (36.59 KiB) Viewed 1154 times
The dropdown menu is set to
RGB and the graph reflects all three channels, Red/Green/Blue. Each color channel can be accessed for adjustments during our coloring process. Directly below the graph are three sliders… Left (0), Right (255), and the Center one called “Gamma” (1.00). That Gamma slider is the one we will be working with during the entire coloring process.
With our processing stack below, we’re going to add the Levels Adjustment Layer on top. On the layer, we are going to set the Blending Mode dropdown to “Normal” (where it is when opened) or “Dissolve”. Either is fine, but there can be a very slight difference depending on the overall luminosity of the processed image. Now, we are ready to change each channel’s Gamma (center) slider.
Switch channels by opening the dropdown menu that is now set at
RGB. Set the Red Channel Gamma to 1.6… You can just type the value in as moving the slider exactly can be difficult. Set the Green Channel Gamma to 0.8 and the Blue Channel Gamma to 0.2… Your image is now colored. However, you can now switch back to the
RGB channel and move the Gamma slider left or right to get the final luminance balance to where you want it.
Done!

You can flatten the layers and save for the web (JPEG), or if you want to add another layer above the Levels layer, a Brightness & Contrast Adjustment Layer might be worth looking at.
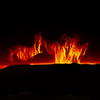
Here’s Mark’s image before & after coloring…
If you got this far, I thank you for your time and patience.
Clear Skies & Stay Safe