Be aware of JPEG artifacts when sharpening.

Discuss how you are able to get those fantastic images!!!
Post Reply
User avatar
Lowjiber
Orion Spur Ambassador
Articles: 2
Offline
Posts: 975
Joined: Tue Apr 30, 2019 12:30 pm
4
Location: Las Vegas, Nv, USA
Status:
Offline

TSS Awards Badges

TSS Photo of the Day

Be aware of JPEG artifacts when sharpening.

#1

Post by Lowjiber »


Whether they admit it, or not... Everyone sharpens to some degree.:)

However, a JPEG image posted on the web can appear overly-sharpened when you really didn't do it during processing it as a TIFF. Why? Simply because the JPEG algorithm "compresses" faint features during the process.

I'm going to post some screenshots below from Photoshop. However, just saving the screenshot will itself be a JPEG and some of the finer details may be re-compressed.:lol:

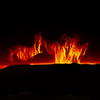
Here is very frilly prom (Hydrogen-alpha) that I posted as a JPEG on a forum in 2018...
WITH JPEG COMPRESSION PROM.jpg
Looks "okay", but compare it with this one that has had the compression removed..
JPEG COMPRESSION REMOVED PROM.jpg
Even looking at the two thumbnails, it is obvious that the second one is much smoother, and better represents what the prom really looked like when shot.

(In my layer stack, the second (red) layer removed the artifacts and turning it on/off was all I did to make the screenshot. Note the "eyeball".)

Perhaps to a lesser degree JPEG compression can even affect a white-light image. Here's a very nice WL image of AR2781 shot by Mark, aka "Thefatkitty" last week... Thanks Mark! :) Compression on...
WITH JPEG COMPRESSION.jpg
Take note in particular the white spots in the penumbra surrounding the black area (numbra) of the spot itself and compare them with the same ones when the compression is off...
JPEG COMPRESSION REMOVED.jpg

So, how do we fix it? After all, sharpening is a part of this game. The short answer is... We can't. JPEG images are just a fact-of-life when posting on the web.

We can, however, negate much of the effect before we save our work for the web... sort of.:lol:

First off, dull your sharpening pencil.:lol: By that, I simply mean to be judicious when sharpening in the first place. That sounds easy and it is. Our next step will help you sneak up on the amount of sharpening that you can "get away with".:)

Photoshop, and others, allows one work away processing via a stack of layers, each one being an additional edit. What many don't know is that PS lets one save all of those layers as a single file called a PSD file. A PSD file can be re-opened and each adjustment layer can be re-adjusted. While some filters are "destructive" (Unsharp Mask for example) they too can be overcome by using a "Smart Object" adjustment layer.

Before I flatten my working stack to save it for a JPEG, I save the entire stack as a PSD file. That way I can flatten and save as a JPEG to see how much I lost via the compression. If it is too much, it is a simple matter to open the PSD file for adjustment before doing the whole JPEG compression thing again. It may seem tedious, but it is really very simple once you become accustomed to it.:)

If you got this far, I thank you for your patience and solicit your comments below.:)

Clear Skies & Stay Safe
John (Urban Astronomer) Apertura AD10 Dob; XLT 150 Dob; XLT 120EQ; Lunt Solar 60 PT/B1200; ES AR102; SW Pro 100ED; 2 SW Pro 80ED's; 90mm Eq; WO Z-61; SW 90mm Virtuso Mak; 2 Orion ST-80's; Quark-C; Cams: Polemaster, ASI120MM-S, ASI174MM & ASI174MM-C
User avatar
Juno16 United States of America
Universal Ambassador
Articles: 0
Offline
Posts: 8210
Joined: Sun May 12, 2019 3:13 pm
4
Location: Mississippi Gulf Coast
Status:
Offline

TSS Awards Badges

TSS Photo of the Day

Re: Be aware of JPEG artifacts when sharpening.

#2

Post by Juno16 »


Excellent John!

As a relatively new user of Photoshop (for full image processing), I appreciate your recommendation on judicious sharpening. I will have to look into the "Smart Object" adjustment layers too!

Thanks John!
Jim

Scopes: Explore Scientific ED102 APO, Sharpstar 61 EDPH II APO, Samyang 135 F2 (still on the Nikon).
Mount: Skywatcher HEQ5 Pro with Rowan Belt Mod
Stuff: ASI EAF Focus Motor (x2), ZWO OAG, ZWO 30 mm Guide Scope, ASI 220mm min, ASI 120mm mini, Stellarview 0.8 FR/FF, Sharpstar 0.8 FR/FF, Mele Overloock 3C.
Camera/Filters/Software: ASI 533 mc pro, ASI 120mm mini, ASI 220mm mini , IDAS LPS D-1, Optolong L-Enhance, ZWO UV/IR Cut, N.I.N.A., Green Swamp Server, PHD2, Adobe Photoshop CC, Pixinsight.
Dog and best bud: Jack
Sky: Bortle 6-7
My Astrobin: https://www.astrobin.com/users/Juno16/
User avatar
Lowjiber
Orion Spur Ambassador
Articles: 2
Offline
Posts: 975
Joined: Tue Apr 30, 2019 12:30 pm
4
Location: Las Vegas, Nv, USA
Status:
Offline

TSS Awards Badges

TSS Photo of the Day

Re: Be aware of JPEG artifacts when sharpening.

#3

Post by Lowjiber »


Juno16 wrote: Tue Nov 10, 2020 8:25 pm As a relatively new user of Photoshop (for full image processing), I appreciate your recommendation on judicious sharpening. I will have to look into the "Smart Object" adjustment layers too!
If you'll notice on my screenshots above, I make the second layer of any processing a Smart Object. With Smart Objects you need to use Image>Adjustments to see the same list as in the normal Adjustments tab. Also, if you use a filter it is exactly the same with both... The filter will apply to the SO and can be re-opened to adjust accordingly.

If you need to change the Blend mode of any adjustment made to a Smart Object, just dbl-click on the little icon right of the filter. An example is a High Pass Filter... It needs to have say a "Soft Light" (etc) blend mode. Only that filter will have the blend mode desired. (Many times, I'll reopen a HP Filter to change the Radius up/down from where I first applied it.) Smart Objects make perfect sense to me.

However, I'm color blind. So I apply my colors with either a Levels or Color Balance LAYER above the SO. You can do it 'under' a SO, but I use a pre-recorded 'action' to apply my color... Otherwise, I end up with a pink sun. :lol:
John (Urban Astronomer) Apertura AD10 Dob; XLT 150 Dob; XLT 120EQ; Lunt Solar 60 PT/B1200; ES AR102; SW Pro 100ED; 2 SW Pro 80ED's; 90mm Eq; WO Z-61; SW 90mm Virtuso Mak; 2 Orion ST-80's; Quark-C; Cams: Polemaster, ASI120MM-S, ASI174MM & ASI174MM-C
User avatar
Juno16 United States of America
Universal Ambassador
Articles: 0
Offline
Posts: 8210
Joined: Sun May 12, 2019 3:13 pm
4
Location: Mississippi Gulf Coast
Status:
Offline

TSS Awards Badges

TSS Photo of the Day

Re: Be aware of JPEG artifacts when sharpening.

#4

Post by Juno16 »


Lowjiber wrote: Tue Nov 10, 2020 9:43 pm
Juno16 wrote: Tue Nov 10, 2020 8:25 pm As a relatively new user of Photoshop (for full image processing), I appreciate your recommendation on judicious sharpening. I will have to look into the "Smart Object" adjustment layers too!
If you'll notice on my screenshots above, I make the second layer of any processing a Smart Object. With Smart Objects you need to use Image>Adjustments to see the same list as in the normal Adjustments tab. Also, if you use a filter it is exactly the same with both... The filter will apply to the SO and can be re-opened to adjust accordingly.

If you need to change the Blend mode of any adjustment made to a Smart Object, just dbl-click on the little icon right of the filter. An example is a High Pass Filter... It needs to have say a "Soft Light" (etc) blend mode. Only that filter will have the blend mode desired. (Many times, I'll reopen a HP Filter to change the Radius up/down from where I first applied it.) Smart Objects make perfect sense to me.

However, I'm color blind. So I apply my colors with either a Levels or Color Balance LAYER above the SO. You can do it 'under' a SO, but I use a pre-recorded 'action' to apply my color... Otherwise, I end up with a pink sun. :lol:
Very interesting! I just played around with a Smart Object duplicate layer and I see what you mean. The Smart Object is another great tool to use for processing. Thank you John!
Jim

Scopes: Explore Scientific ED102 APO, Sharpstar 61 EDPH II APO, Samyang 135 F2 (still on the Nikon).
Mount: Skywatcher HEQ5 Pro with Rowan Belt Mod
Stuff: ASI EAF Focus Motor (x2), ZWO OAG, ZWO 30 mm Guide Scope, ASI 220mm min, ASI 120mm mini, Stellarview 0.8 FR/FF, Sharpstar 0.8 FR/FF, Mele Overloock 3C.
Camera/Filters/Software: ASI 533 mc pro, ASI 120mm mini, ASI 220mm mini , IDAS LPS D-1, Optolong L-Enhance, ZWO UV/IR Cut, N.I.N.A., Green Swamp Server, PHD2, Adobe Photoshop CC, Pixinsight.
Dog and best bud: Jack
Sky: Bortle 6-7
My Astrobin: https://www.astrobin.com/users/Juno16/
User avatar
Lowjiber
Orion Spur Ambassador
Articles: 2
Offline
Posts: 975
Joined: Tue Apr 30, 2019 12:30 pm
4
Location: Las Vegas, Nv, USA
Status:
Offline

TSS Awards Badges

TSS Photo of the Day

Re: Be aware of JPEG artifacts when sharpening.

#5

Post by Lowjiber »


Here's another thought...

I wanted to apply a little color to Mark's image of AR 2781 this morning, but only had kept his JPEG image that I used in the original post. Knowing that once I added color I would be saving it yet again as a JPEG... Thus doubling the artifacts with a re-compression of the original compression.

So, I removed the original JPEG artifacts and went ahead coloring the result with Photoshop using Levels. I then saved it as a JPEG. By removing the first cycle of compression, the result was much better than if I had just re-saved it and doubled the compression artifacts.
AR2781 COLORED.jpg
I'll add that there is another way to do the same thing... There is a stand-alone application by Topaz Labs called "JPEG to Raw AI" that will convert the original JPEG into a 16-bit TIFF. It does the same thing and works just fine. I just don't want the hassle of leaving PS to go to another application, so I prefer the method(s) shown here. (Both methods are driven by artificial intelligence, so the algorithms basically give the same results.)
John (Urban Astronomer) Apertura AD10 Dob; XLT 150 Dob; XLT 120EQ; Lunt Solar 60 PT/B1200; ES AR102; SW Pro 100ED; 2 SW Pro 80ED's; 90mm Eq; WO Z-61; SW 90mm Virtuso Mak; 2 Orion ST-80's; Quark-C; Cams: Polemaster, ASI120MM-S, ASI174MM & ASI174MM-C
Post Reply

Create an account or sign in to join the discussion

You need to be a member in order to post a reply

Create an account

Not a member? register to join our community
Members can start their own topics & subscribe to topics
It’s free and only takes a minute

Register

Sign in

Return to “Image processing”