Come join the friendliest, most engaging and inclusive astronomy forum geared for beginners and advanced telescope users, astrophotography devotees, plus check out our "Astro" goods vendors.
Come join the friendliest, most engaging and inclusive astronomy forum geared for beginners and advanced telescope users, astrophotography devotees, plus check out our "Astro" goods vendors.
I'm still learning how to use the Pixinsight MureDenoise script. The script requires two inputs:
Gain (e-/DN)
Gaussian Noise (DN)
In my previous post I used the wrong values for these two inputs, and, it caused too much noise reduction which not only reduced the noise, but, it blurred the image details. This was evident in my previous post.
This time I was careful to input the proper values for the two script inputs, and, the noise reduction was properly controlled. The resulting image has the same or better "crispness" as I achieve with normal noise reduction (MLT) in the linear processing. The image using the proper MureDenoise inputs is shown below.
Scopes: Explore Scientific ED102 APO, Sharpstar 61 EDPH II APO, Samyang 135 F2 (still on the Nikon).
Mount: Skywatcher HEQ5 Pro with Rowan Belt Mod
Stuff: ASI EAF Focus Motor (x2), ZWO OAG, ZWO 30 mm Guide Scope, ASI 220mm min, ASI 120mm mini, Stellarview 0.8 FR/FF, Sharpstar 0.8 FR/FF, Mele Overloock 3C.
Camera/Filters/Software: ASI 533 mc pro, ASI 120mm mini, ASI 220mm mini , IDAS LPS D-1, Optolong L-Enhance, ZWO UV/IR Cut, N.I.N.A., Green Swamp Server, PHD2, Adobe Photoshop CC, Pixinsight.
Dog and best bud: Jack
Sky: Bortle 6-7
My Astrobin: https://www.astrobin.com/users/Juno16/
Juno16 wrote: ↑Tue Sep 01, 2020 12:09 am
Really nice improvement Steve! Well done!
Thanks Jim - I think this new process (new for me) is going to become part of my normal processing flow in the Linear processing phase. I'm really impressed with how well it brings out the low-level nebulosity. It's fun to learn something new that really helps.
Cheers,
Steve
Steve King: Light Pollution (Bortle 5)
Telescope + Mount + Guiding: W.O. Star71-ii + iOptron CEM40 EC + Orion Magnificent Mini AutoGuider
Camera: ASI 1600MM Pro + EFW Filter Wheel + Chroma 3nm Siii, Ha, Oiii + ZWO LRGB Filters
Software: PHD2; APT; PixInsight ***** My AP website: www.steveking.pictures
Juno16 wrote: ↑Tue Sep 01, 2020 12:09 am
Really nice improvement Steve! Well done!
Thanks Jim - I think this new process (new for me) is going to become part of my normal processing flow in the Linear processing phase. I'm really impressed with how well it brings out the low-level nebulosity. It's fun to learn something new that really helps.
Cheers,
Steve
Thats true. It is a lot to fun to learn something new. Just figured Starnet++ out and how to use masks in Photoshop to help with star bloating. Lots of fun with nice results!
Jim
Scopes: Explore Scientific ED102 APO, Sharpstar 61 EDPH II APO, Samyang 135 F2 (still on the Nikon).
Mount: Skywatcher HEQ5 Pro with Rowan Belt Mod
Stuff: ASI EAF Focus Motor (x2), ZWO OAG, ZWO 30 mm Guide Scope, ASI 220mm min, ASI 120mm mini, Stellarview 0.8 FR/FF, Sharpstar 0.8 FR/FF, Mele Overloock 3C.
Camera/Filters/Software: ASI 533 mc pro, ASI 120mm mini, ASI 220mm mini , IDAS LPS D-1, Optolong L-Enhance, ZWO UV/IR Cut, N.I.N.A., Green Swamp Server, PHD2, Adobe Photoshop CC, Pixinsight.
Dog and best bud: Jack
Sky: Bortle 6-7
My Astrobin: https://www.astrobin.com/users/Juno16/
That's a beautiful image--quite a dramatic, rich contrast between the background and the nebulosity.
There's also a variance scale setting with Mure Denoise. How did you arrive at this value? Christopher Foster posted a guide where he suggested opening a bunch of previews, running Mure Denoise with a different variance scale on each preview, and seeing which setting is best in the side-by-side comparisons. Did you fine-tune the variance scale in this way?
DEnc wrote: ↑Tue Sep 01, 2020 2:33 am
That's a beautiful image--quite a dramatic, rich contrast between the background and the nebulosity.
There's also a variance scale setting with Mure Denoise. How did you arrive at this value? Christopher Foster posted a guide where he suggested opening a bunch of previews, running Mure Denoise with a different variance scale on each preview, and seeing which setting is best in the side-by-side comparisons. Did you fine-tune the variance scale in this way?
David
Thanks David -
The tutorial I watched recommended setting the Variance scale = 0.5 and the Cycle-spin count = 8 and I followed the suggestions. As I get more comfortable with this process I may start to experiment with these two settings. However, for now I'll probably stick with the "cookbook" approach . I'm very happy to have found this process!!
Steve
Steve King: Light Pollution (Bortle 5)
Telescope + Mount + Guiding: W.O. Star71-ii + iOptron CEM40 EC + Orion Magnificent Mini AutoGuider
Camera: ASI 1600MM Pro + EFW Filter Wheel + Chroma 3nm Siii, Ha, Oiii + ZWO LRGB Filters
Software: PHD2; APT; PixInsight ***** My AP website: www.steveking.pictures
Hi Steve,
I responded to your first reprocess. I didn't know you had started a reprocess post #2. I am curious where you got your Gain and Noise values. Gain you can get from the ASI1600 specs. I am not sure if Noise is the read noise you can get from the specs or if it is suppose to include all of the noise components. You can get an estimate for these values with the MureDenoiseDetectorSettings script and two un-calibrated Bias and two un-calibrated Flats. This works well for my CCD. For the ASI1600, I don't know what the AmpGlo impact would be for these estimates; and I know you don't take bias for CMOS. But I have used this estimator very effectively .Typically, my optimum settings for Variance scale is 1.0 (look for the checker boarding pattern to verify if Variance scale is set too high). BTW, I use 16 spin cycles - probably overkill, but I have found that too low will do an incomplete job; too high does not harm the image in any way, but it will take a longer time.
I have borrowed an ASI1600MM-Cool from a friend to try (since I am interested in getting one), so I have been doing a little bench testing. I also notice that in fits files from SGP pixel values are multiplied by 16 (65536/4096) to use a full 16 bit scale (pixel values go OFFSET+ 0,16,32,48,64,80, etc. for 1x1bin) I haven't been under the stars yet with this camera for any images to integrate, but I am worried that this scaling to 16 bit might have an impact when using ZWO published values of Gain for 12 bit (max ADU = 4095). Using bias and flats (possibly Flat-Darks) taken from SGP and using the estimator might be better. Of course an integrated result from PI is 32 bit-Float, so when many subs are integrated (greater than 20 or so), pixel values will go [OFFSET+n where n is the floating point result and n is a real number not necessarily an integer].
Can you provide a link to the tutorial you watched? Was it specifically for the ASI1600?
Bottom line, is that I have been very impressed with MureDenoise for my KAF8300 CCD sensor, but things go off the rails pretty quickly if you put in arbitrary parameter values not matched to your sensor or use anything other than a raw, un-sampled integrated stack image.
Jim Thommes Jim's Astrophotography
David Levy Maksutov Newtonian, Celestron Edge 9.25, FSQ-106N Refractor (on loan), WO ZenithStar 66 APO Refractor, WO Megrez II APO, Sigma 150 mm EOS Lens
Losmandy G11/Gemini, iOptron GEM45, Celestron Advanced VX, iOptron CEM70
ST8300M Camera, Atik 383L, Canon 350D (IR cut modified), ASI1600M, ASI294M, ASI260M
Observatory - Desert Astronomy Association (Shelter Valley, CA)
Hi again -
I tried the MureDenoiseDetectorSettings script, but, it didn't work well for me. It underestimated my Gain by over a factor of 2 and gave poor results.
So, I used the Gain value from the 1600MM spec sheet. However, you need to divide the Gain from the spec sheet by 16 (the scaling factor between the camera's native 12 bit A/D and the 16 bit camera output) to get the proper Gain for the Mure process. In my case I'm using a camera gain setting of 140 which produces a spec sheet Gain of 1 e-/ADU. Dividing this by 16 yields the proper value for the Mure process which is 1/16 = 0.0625.
For the noise I used the combination of the Read noise and the Dark Current noise (both available from the spec sheets). At my gain setting of 140 the Read noise = 1.7 e-. I run at -15C so the Dark Current = 0.009 e-/sec. For my 600 sec exposures the noise = sqrt(600x0.009) = 2.32 e-. The total noise is sqrt[1.7^2 + 2.32^2] = 2.88 e-. Multiplying this by 16 yields the proper value for the Mure Gaussian noise which is 2.88 x 16 = 46.
Of course your Gain and Gaussian noise values will be different.
Thanks for the tip on setting the Variance (checkerboard pattern indicates too high a setting) and also on the spin cycles.
The number of experiments I've been doing with my 40 hour, 50 hour data sets are in the dozens now. One of them was playing the MureDenoise settings. I had three flats to give to the detector settings based on my three filters and it gave me three different values for the gain. The 2.4 is what QHY reports as the factory setting.
So yes, the correct settings changes the SNR seemingly significantly (639->659, and 679->701) but overall just doing MD is far more of a radical change (321->659, 342->701)
How're you measuring you're doing something right? Are you using SNRWeight or SNR? Or some other metric? Or just going by visual inspection?
For noise evaluation, I use the script "Image Analysis > NoiseEvaluation". It gives the exact same results as the ImageIntegration process when you have "Evaluate Noise" checked. I believe this is a measurement performed essentially on the background pixels (basically, the sigma of all background pixels). There are no parameters to set and I question the accuracy for very low noise images since the pixel sample gets smaller and smaller as noise is reduced.
Visual impact is pretty noticeable as Steve has indicated. This NoiseEvaluation process provides a nice quantitative measure and is pretty helpful for comparative before/after inspections of various settings for MureDenoise (if you are interested in spending several hours watching spin cycles).
Steve , Thanks for the link and thanks for confirming the 16x factor for the values. I do like your noise component estimation. But I do notice you use the spec value for dark current. My understanding of dark current is that it contains the static component and the noise component. The noise component is a fraction of the total (Static DC plus noise). If so, I think your dark current noise factor is a bit high thus raising the overall value for "Gaussian noise" parameter. This may cause you to use a lower value of variance scale?? (Are you still using about 0.5?)
We haven't discussed "Combination count" or "Interpolation method". I check the "Use image metadata" box to get these parameters from the integrated image. But I have found that sometimes they are not updated so I always check them.
PS - I wonder if we are getting too far off forum topic and this thread needs to move to the processing forum??
Jim Thommes Jim's Astrophotography
David Levy Maksutov Newtonian, Celestron Edge 9.25, FSQ-106N Refractor (on loan), WO ZenithStar 66 APO Refractor, WO Megrez II APO, Sigma 150 mm EOS Lens
Losmandy G11/Gemini, iOptron GEM45, Celestron Advanced VX, iOptron CEM70
ST8300M Camera, Atik 383L, Canon 350D (IR cut modified), ASI1600M, ASI294M, ASI260M
Observatory - Desert Astronomy Association (Shelter Valley, CA)
jthommes wrote: ↑Wed Sep 02, 2020 5:46 pm
Steve , Thanks for the link and thanks for confirming the 16x factor for the values. I do like your noise component estimation. But I do notice you use the spec value for dark current. My understanding of dark current is that it contains the static component and the noise component. The noise component is a fraction of the total (Static DC plus noise). If so, I think your dark current noise factor is a bit high thus raising the overall value for "Gaussian noise" parameter. This may cause you to use a lower value of variance scale?? (Are you still using about 0.5?)
We haven't discussed "Combination count" or "Interpolation method". I check the "Use image metadata" box to get these parameters from the integrated image. But I have found that sometimes they are not updated so I always check them.
PS - I wonder if we are getting too far off forum topic and this thread needs to move to the processing forum??
Hi Jim - I've worked with detector noise for a good portion of my working career. The Dark Current spec just describes how much dark current (expressed as e-/sec) you will have depending upon the chip temperature. For a given pixel, the Dark Current noise (variation in the number of collected e- from one image to the next) is equal to the square root of the average number of electrons collected. The colder the chip the lower the Dark Current which is why cooling the chip is important. I've never heard of Dark Current noise being described in any other way.
I need to look into the "NoiseEvaluation".
I'm currently investigating what "Interpolation method" WBPP is using.
AS for the Variance setting I'll be trying values larget than 0,5 to see how they work.
I'm not familiar with having a thread moved from one subforum to another. That would be fine with me.
Steve
Steve King: Light Pollution (Bortle 5)
Telescope + Mount + Guiding: W.O. Star71-ii + iOptron CEM40 EC + Orion Magnificent Mini AutoGuider
Camera: ASI 1600MM Pro + EFW Filter Wheel + Chroma 3nm Siii, Ha, Oiii + ZWO LRGB Filters
Software: PHD2; APT; PixInsight ***** My AP website: www.steveking.pictures
STEVE333 wrote: ↑Wed Sep 02, 2020 10:46 pm
....
Hi Jim - I've worked with detector noise for a good portion of my working career. The Dark Current spec just describes how much dark current (expressed as e-/sec) you will have depending upon the chip temperature. For a given pixel, the Dark Current noise (variation in the number of collected e- from one image to the next) is equal to the square root of the average number of electrons collected. The colder the chip the lower the Dark Current which is why cooling the chip is important. I've never heard of Dark Current noise being described in any other way.
.....
I'm not familiar with having a thread moved from one subforum to another. That would be fine with me.
Steve
Aha! I missed the SQRT function in front of "(600x0.009)". Makes sense. Happy you set that straight. I am happy with the approach to detector settings for the ASI1600 that you have outlined.
I don't know how to move to another forum either. I suppose if administrators want us to move, they will help with that action.
Jim Thommes Jim's Astrophotography
David Levy Maksutov Newtonian, Celestron Edge 9.25, FSQ-106N Refractor (on loan), WO ZenithStar 66 APO Refractor, WO Megrez II APO, Sigma 150 mm EOS Lens
Losmandy G11/Gemini, iOptron GEM45, Celestron Advanced VX, iOptron CEM70
ST8300M Camera, Atik 383L, Canon 350D (IR cut modified), ASI1600M, ASI294M, ASI260M
Observatory - Desert Astronomy Association (Shelter Valley, CA)
Background: I'm learning the wonders of drizzle and local normalisation in PI which are amazing - I can see massive improvements in my data after doing one or both of these. This is a heterogeneous data set combining two different resolutions/image scales and instead of integrating them separately and doing a mosaic or HDRComposition* I decided to just integrate the whole thing for what I assume would be more robust statistics for rejection of outliers and better contrast (it's basically an issue of taking 100% of my data and integrating it once or 50% x 2 and then combining them using some process*).
But this question is about MureDenoise: after Drizzling, I am a 2x the image scale and I don't plan to get back to 1x until I'm about to go linear. The first step is MureDenoise and I don't have a flat field that is 2x - should I rescale my flat to 2x or just ignore the flatfield option in MureDenoise. or should I not use MureDenoise at all?
I did try out the no-flatfield option with the with default settings with a variance scale of 1.0 and spin cycle of 8 but nothing happened. I also tried it with the flatfield on the localnormalized version (but not drizzled) and nothing happened. This is weird since when I did it with the O3 data it worked really nicely.
--Ram
* While HDRComposition, GHDRComposition, and GradientMergeMosaic "work", they're not 100% perfect, they have bubbles or seams or visible, etc. and I was planning to correct them by mixing and matching from a clear set. I could go that route but the solutions I've found involving LN and Drizzle are perfect - I can't tell where the seams are, everything seems really robust and I'm able to bring out details (as I posted in another thread) and/or improve resolution and/or deal with the seams, that I wouldn't otherwise by not doing it this way.
Hi Ram - I've been using MureDenoise for a little while now. I have not use the Flatfield option so I can't help there.
I've had the best success when I take my "stacked" image and do Mure on it before doing any other operations on the image. If I try ABE or DBE before using Mure the Mure will do nothing.
There is a tradeoff with Mure as with all noise reduction processes. I've found the best compromise for me has been a Variance scale of 0.5 with 4 spin cycles. Increasing either of those numbers will improve the noise reduction but at the expense of losing more details.
Another thing to watch is that the Interpolation method chosen for Mure must match the one used when the images were registered.
Hope this helps.
Steve
Steve King: Light Pollution (Bortle 5)
Telescope + Mount + Guiding: W.O. Star71-ii + iOptron CEM40 EC + Orion Magnificent Mini AutoGuider
Camera: ASI 1600MM Pro + EFW Filter Wheel + Chroma 3nm Siii, Ha, Oiii + ZWO LRGB Filters
Software: PHD2; APT; PixInsight ***** My AP website: www.steveking.pictures
STEVE333 wrote: ↑Thu Oct 15, 2020 5:00 am
Hi Ram - I've been using MureDenoise for a little while now. I have not use the Flatfield option so I can't help there.
I've had the best success when I take my "stacked" image and do Mure on it before doing any other operations on the image. If I try ABE or DBE before using Mure the Mure will do nothing.
There is a tradeoff with Mure as with all noise reduction processes. I've found the best compromise for me has been a Variance scale of 0.5 with 4 spin cycles. Increasing either of those numbers will improve the noise reduction but at the expense of losing more details.
Another thing to watch is that the Interpolation method chosen for Mure must match the one used when the images were registered.
Hope this helps.
Steve
Yeah, I agree. I think the general rule is that the target for a Mure Denoise should be a stacked linear image. Any resampling (like Ram's 2:1 step) renders Mure Denoise ineffective and possibly counterproductive. I used to rescale a 2x2 binned subframes to 1x1 (resample up by 2). This was done in the registration process. Even this resampling on the subframes destroyed the Mure Denoise effectiveness on the resulting stack of subframes (which were upsampled). Bottom line - use Mure Denoise only on a integration stack of subframes in their native resolution.
Jim Thommes Jim's Astrophotography
David Levy Maksutov Newtonian, Celestron Edge 9.25, FSQ-106N Refractor (on loan), WO ZenithStar 66 APO Refractor, WO Megrez II APO, Sigma 150 mm EOS Lens
Losmandy G11/Gemini, iOptron GEM45, Celestron Advanced VX, iOptron CEM70
ST8300M Camera, Atik 383L, Canon 350D (IR cut modified), ASI1600M, ASI294M, ASI260M
Observatory - Desert Astronomy Association (Shelter Valley, CA)
Oh, and I am pretty sure that the flat field option simply scales the noise correction according to the flatfield. I have not used this either and the Denoise operation semms quite effective and not hampered by the lack of a scaling flat field.
Jim Thommes Jim's Astrophotography
David Levy Maksutov Newtonian, Celestron Edge 9.25, FSQ-106N Refractor (on loan), WO ZenithStar 66 APO Refractor, WO Megrez II APO, Sigma 150 mm EOS Lens
Losmandy G11/Gemini, iOptron GEM45, Celestron Advanced VX, iOptron CEM70
ST8300M Camera, Atik 383L, Canon 350D (IR cut modified), ASI1600M, ASI294M, ASI260M
Observatory - Desert Astronomy Association (Shelter Valley, CA)
Thanks JT - so no MureDenoise for me this time then since the benefit of having a seamlessly integrated image at the end is really hard to pass up.
Does this mean for mosaics people would MureDenoise first also before creating the mosaic? Since my situation is similar except instead of a mosaic I'm just integrating the whole thing in one shot and letting LN and the drizzle take care of the seams. I've really gotten into this form of imaging for multiple targets. I'll post about it in the other (unresolved) thread about filling in gaps in a mosaic.


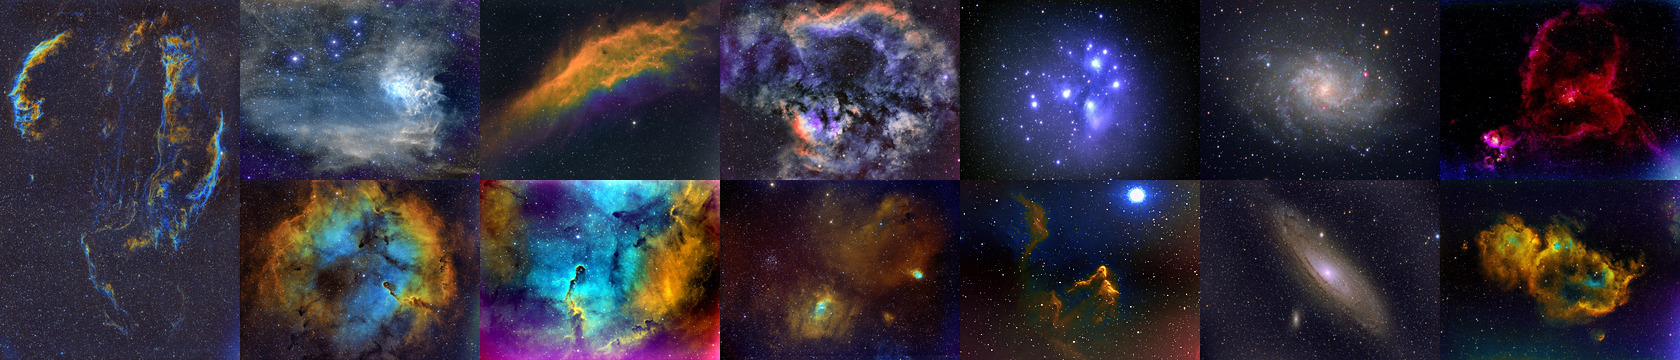
 Wizard Mure New Rotated by STEPHEN KING, on Flickr
 Wizard_SHO_Rotated by STEPHEN KING, on Flickr